Battle for Sluis 11
"It was a bold and exciting plan with a touch of 'into the valley of death' about it"
Introduction
It was September 1944. Dolle Dinsdag (Mad Tuesday) had just passed and operation Market Garden was about to begin. The strategic target of operation Market Garden was a bridgehead on the Veluwe with runners across the IJssel. Airborne troops were charged with securing a number of river crossings, so that the ground units from the XXX Corps could advance. This corps would move in across ‘Hell’s Highway’ from the Belgian border at Eindhoven and Nijmegen to Arnhem. However, the Arnhem Bridge proved ‘a bridge too far’. The unit was covered on both flanks, with the XII Corps on their left and the VIII on their right, but the latter was also made responsible for the area around Someren, Asten, and Helmond. The 11th Armoured Division was part of the VIII Corps under the command of Lieutenant-General G.P.B. Roberts.
Patrick Delaforce writes about the 11th Armoured Division in his book ,The Black Bull:
"The night of the 20th the advance battlegroups were altered. The 3rd Royal Tank Regiment and the 3rd Monmouthshire Regiment with the 23rd Hussars and 8th Rifles were under command of 29 Brigade, and the 2nd Fife and Forfarshire and 1st Herefordshire Light Infantry with 4th King’s Shropshire Light Infantry and 15/19th Hussars were under command of 159 Brigade. 29 Brigade were directed north and 159 Brigade to Someren."
The 3rd Royal Tank Regiment, 23rd Hussars, and 2nd Fife and Forfarshire were units equipped with Sherman tanks. The 15/19th Hussars were the reconnaissance unit of the division; the others belonged to the infantry.
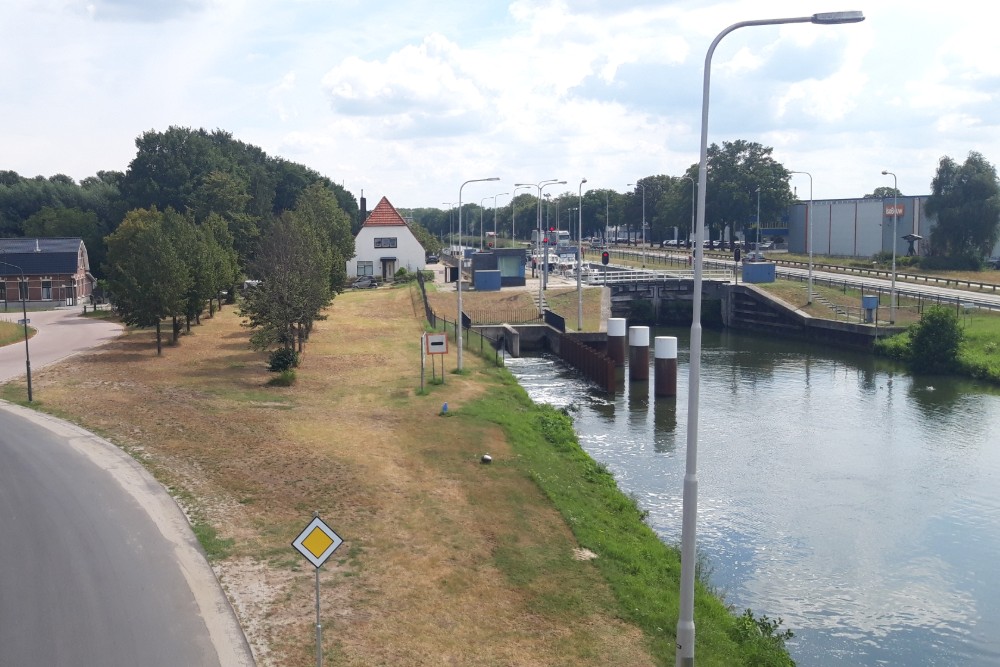
Sluis 11 and the Zuid-Willemsvaart
The Zuid-Willemsvaart is the canal between Maastricht and Den Bosch, which is 76 miles long. There had been a need for the canal as early as the 15th and 16th century, mostly because the Maas was not always accessible. "The city of Den Bossche needs a means to increase traffic and the import of wares from Liège, as well as peat from De Peel van Someren, Asten Deurne, Bakel, etc." Not until the 19th century would construction actually begin. The canal has a drop of 120 feet, which is why the 1820 design calculated 21 locks would be needed. These were numbered from Den Bosch (Sluis 0) to Maastricht (Sluis 20).
Sluis 11 is located south of Helmond, between Someren on the western bank and Asten on the eastern bank. The Zuid-Willemsvaart is east of Hell’s Highway, the advance route of XXX Corps. The eastern part of the route, with Hell’s Highway in the west and the Wilhelmina Canal in the north, was the territory of the 11th Armoured Division. Its task was to establish a bridgehead over the Zuid-Willemsvaart, which would give them control over the area around Helmond, Bakel, Asten, and Someren.
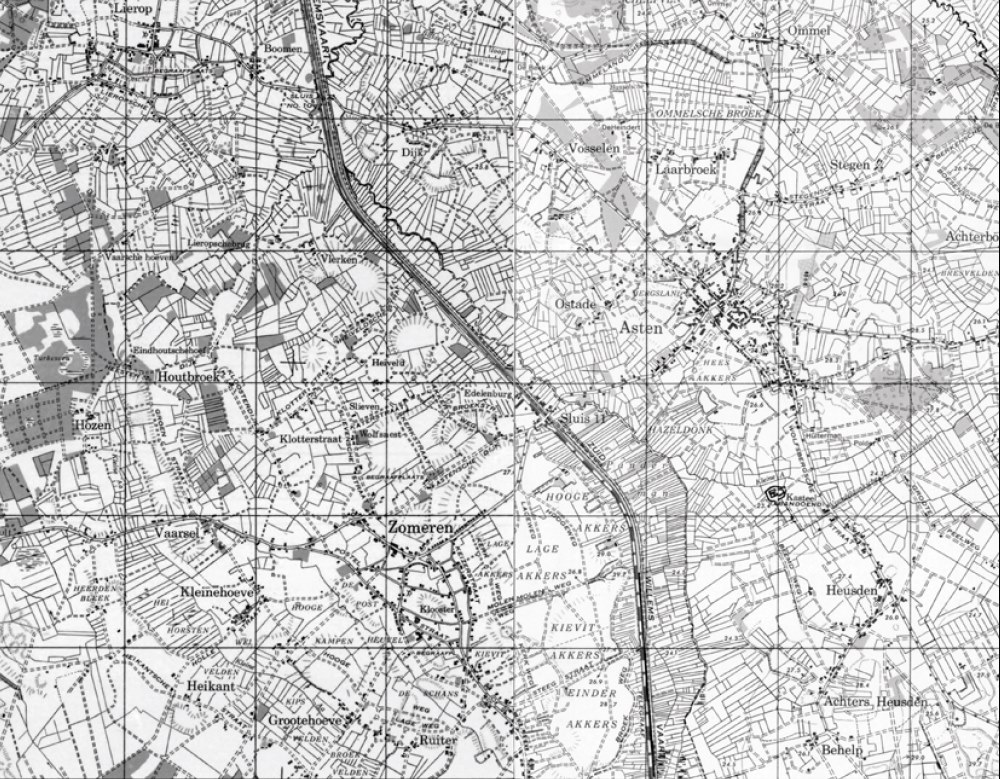
Map of operation area. Source: Photo archive Jeroen Koppes
To this end, General Roberts had divided his units into three spearheads. The northernmost spearhead consisted of the 23rd Hussars and the 8th Rifles. On the 21st September, they marched from Geldrop to Nuenen in order to reach Gerwen and the Gerwerner Heide (Heath). However, they ran into the German tanks and could not advance any further. The next day, on the 22nd, the Germans made a fighting retreat, to Helmond, and there blew up the last bridges across the Zuid-Willemsvaart.
The second group consisted of the 3rd Royal Tank Regiment and the 3rd Monmouthshire Regiment; their main area of operation being the south of Helmond and Mierlo-Hout. They, too, ran into demolished bridges and were delayed. The part of Helmond west of the Zuid-Willemsvaart was liberated by these units on the 22nd. However, they couldn’t cross the canal anywhere, and turned south to use the bridgehead at Sluis 11.
The southern spearhead consisted of the 2nd Fife and Forfarshire Regiment and the 1st Herefordshire Light Infantry Regiment. It concerned itself with Sluis 10 and 11 near Lierop, Someren, and Asten.
The march on Someren
Sluis 10 is sometimes called ‘Boomen Bridge’ in English sources, after the eponymous hamlet. When the tanks of the 2nd Fife and Forfarshire arrived, this bridge, too, turned out to have been destroyed. Consequently, they also had to head south for Sluis 11. Here we see all three spearheads held up by destroyed bridges across the Zuid-Willemsvaart. Every unit had to turn south towards the only bridgehead that was left, Sluis 11 at Someren. But how did the first units get there?
The tanks from the 2nd Fife and Forfarshire were still in Achel on Wednesday the 20th of September, just across the Belgian border. The advance moved towards Leende, which was taken with mild resistance. Heeze was taken next, and the units were welcomed with machine gun fire and anti-tank guns.
At Heeze Castle, a war diary was kept:
"In Heeze sounds always the barking of the machine guns; at 4 o’clock is increased dramatically and mingled there with the artillery of the English tanks that entered the village. Between 6 and 7 the castle’s driveway was within range and when the bullets smashed into the walls we all went into the old castle’s coal cellar, which had been made into a shelter. The blows everywhere were great. Around half past 7 it became quiet. The battle of Heeze had been won by the English."
After this, the sights were set east, and the advance moved to Someren, which was separated from Heeze by the Strabrechtse Heide (heath) and several forested areas. Ceaselessly the flood of English vehicles streamed into the village. A part drove away to Someren via the Bosch Lane.
A bridge, probably across the Sterksels Aa, collapsed due to heavy traffic, but the advance continued nonetheless along an alternative route. Via the Vaarselstraat and the Speelheuvelstraat, right before dark on the 20th, the first troops reached Someren. A number of Germans with Panzerfäuste had set up a cannon at the Markt in Someren; the British, however, ignored it and later managed to retreat across Sluis 11. The infantry of the Herefordshire Regiment, who drove along on the back of the Fife and Forfarshire tanks, attempted to get their hands on the bridge at Sluis 11, but this too was blown up by the Germans just before their arrival. The advance ran both across the Kanaalstraat and the parallel Schoolstraat. At the time the Schoolstraat started at the Speelheuvel, where the Avennelaan is now. It was the houses on these two streets that suffered during the liberation days. Six farms and a double council house were destroyed.
The next morning at 6 am the A and C Squadron from Fife and Forfar were sent north along the canal in search of other bridges. C Company from the Herefords rode along on the C Squadron tanks. As stated before, they ran into the destroyed Boomenbrug at Sluis 10. Both units returned to Sluis 11. There was nothing else for it but to shoot the enemy across the canal and to force a crossing here.
The German defence of Sluis 11
Against exactly which units the British fought is difficult to trace, because many units fought at the bridgehead. The book Geschiedenis van Someren in de Tweede Wereldoorlog (‘History of Someren in the Second World War’) indicates that initially 16- to 17-year-old boys were stationed there, under the supervision of a Red Cross soldier.
"Instead of training for the coming battle, they spent their time fishing in the canal. He was planning to surrender his group without fighting if the English showed up. A group of 120 SSers along with their staff settled at the Lammers family home at Sluis 11. When these took over command the boys were sent into battle."
Major Hutchinson, commander of the A Squadron, 2nd Fife and Forfar, told in an interview that he thought they would be up against German parachutists.
Around noon on the 21st the Germans ordered the evacuation of Asten. Everyone had to be out by 4. Many inhabitants buried their valuables in their shelters or gardens and left the village with the few possessions they could carry:
"If you pitied the children and mothers, you would choke up at the sight of an old man, his nose almost touching the ground, pushing a fully loaded wheelbarrow. […] An elderly couple, without any earthly possessions whatsoever, shuffled, holding each other’s arm, up the road to Liessel. Now and then they would stop and look back at the village." "Around 5 o’clock it was a ghost town. There was no sound at all, except the occasional cannon fire and the impact of a grenade."
The crossing
The Hereford infantry had started transferring the first two companies to make the bridgehead at 7.30 pm on the 21st. A and D Company crossed the canal with assault boats. C Company followed via the still intact lock gates. They were supported by artillery that formed a ring around the bridgehead and the entire town of Asten in that moment. Around 2 am the German counterattack, which would last three hours, began from Asten. At this, the German forces managed to infiltrate the British positions. The counterattack was repulsed with heavy artillery fire in the early morning.
Lieutenant Robert Jackson was a liaison officer at the brigade headquarters. At the time of the counterattack, he was at the bridge. He knew how dire the situation was and personally assembled a number of people who had stayed behind to get them to the bridgehead across the gates. After having reported the situation he crossed again with a number of people who had stayed behind to take up position there with 15 men. After heavy fighting, which included hand-to-hand combat, Jackson was left with a mere half a dozen men. Major How described him as a modern Horatio. According to legend, Horatio single-handedly defended a bridge in Rome against the Etruscans in 507 BC. For his excellent leadership and bravery Lieutenant Jackson was awarded the Distinguished Service Order. He was killed in battle in northern Germany on the 4th of April, 1945, and is buried near Hannover.

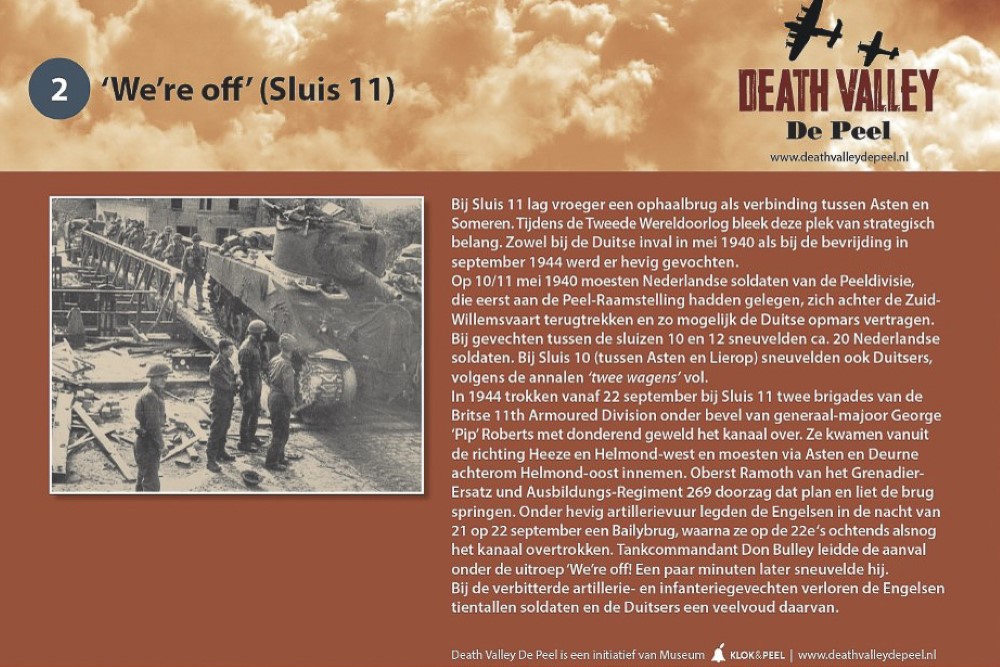
As a tank division trying to cross a river, lock gates alone will not do you much good. It was decided, then, that a Bailey bridge would be constructed at the Sluis in the night of September 21st. For this, they used ‘artificial moonlight’; by aiming search lights at the clouds they could produce enough light to work. At 9 pm, the Airborne Engineers of the 13 Field Squadron started the demolition of the remains of the old bridge and started to transport a number of Hereford vehicles across the river using rafts. At 11 pm the actual construction of the bridge started. At 2 am the German counterattack took place, which caused the construction to be ceased at 3.30 am. Even the Engineers Unit were used in the infantry during the counterattack. Construction continued at 5 am, and the bridge was finished by 6.15 am. The very same day, on the 22nd, a similar bridge was built near the first, of which construction lasted from 2 pm to 6 pm.
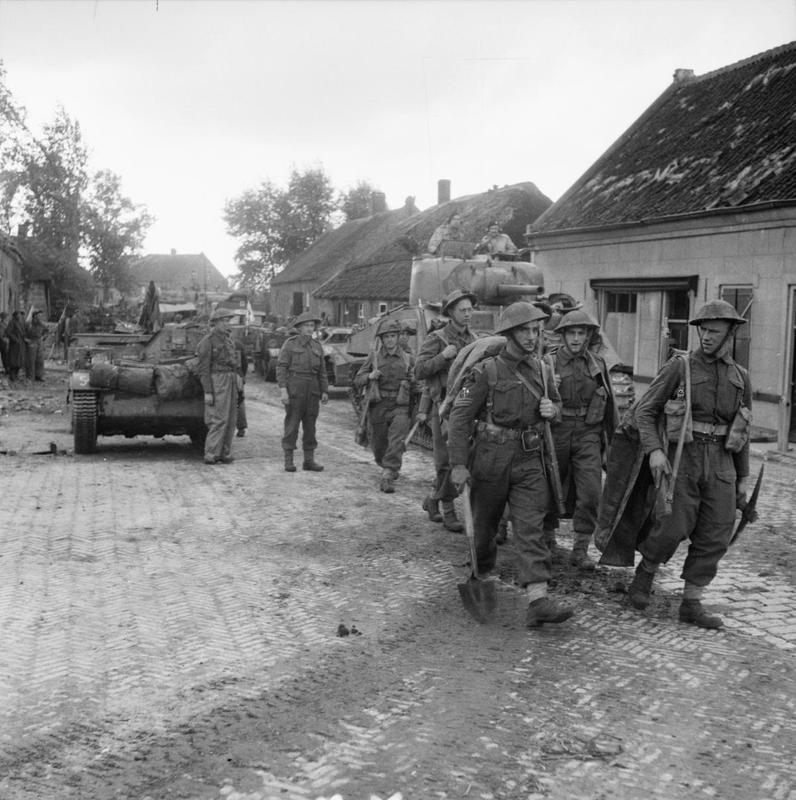
At 6.15 am on the 22nd the first bridge was ready and the advance could be continued with tanks. A 2nd Fife and Forfar Squadron was assigned to cross the bridge first. The command was to drive full speed across the bridge at 7.30 am, and immediately pass through Asten to secure the roads that led north, east, and south out of the town. These were most likely the roads to Ommel (Ommelseweg), Liesel (Voordeldonk), and Heusden (Wolfsberg).
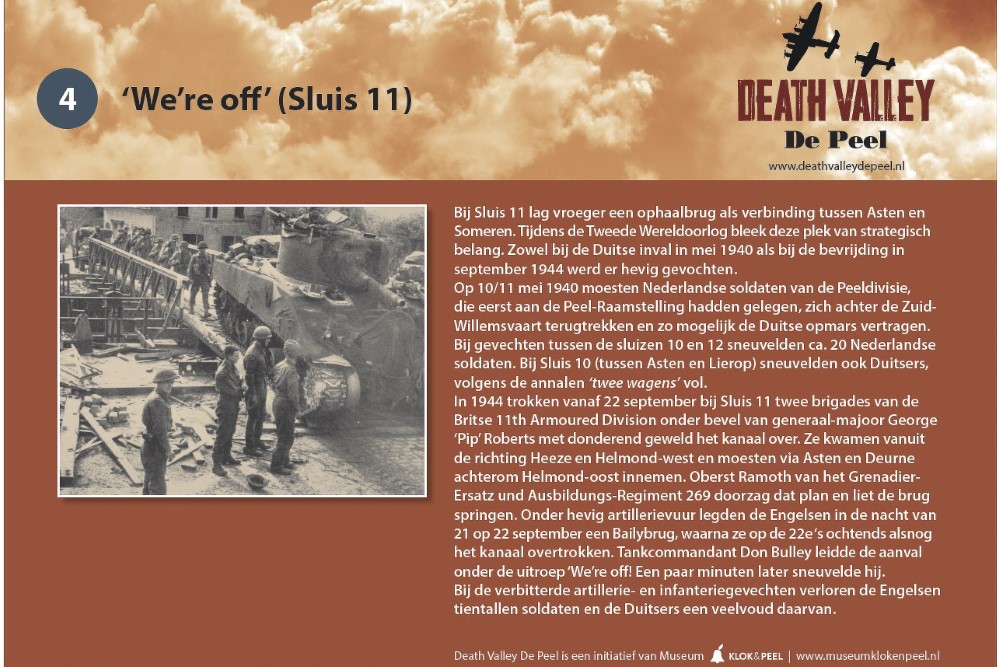
Into the valley of death
Crossing the Bailey bridge was not the problem, as the Herefords had established a small bridgehead at the Asten side of the channel. Advancing by racing through the town with tanks was madness. The man tasked with running the gauntlet was Lieutenant Don Bulley. He led the first troop of three tanks across and his tank was the first to brave the bridge. After the initial artillery barrage Bulley checked his watch, yelled, "We’re off!", and drove his tank across the bridge. Firing all the while he headed for Asten, where he was hit from the houses with heavy machine gun and bazooka fire. Suddenly his tank disappeared in a cloud of smoke and fire. The tank that followed tried to dodge Bulley’s tank by driving into a field, but soon got stuck. The third and last tank of the troop shot left past Bulley’s and got stuck as well. Bulley initially survived. He started shooting Germans from the turret of the tank with his gun and was mortally wounded in the process. He is buried in the nearby town of Mierlo.
Captain Alec Wardman from the Herefords saw the first tank cross:
"A few Germans had hidden in a culvert under the road. When the first [Fife] tank arrived the Jerrys drew a cable with mines on it over the road. Although we could see what was happening we fired on the Germans but it was too late."
The next troop, led by Lieutenant W. S. Brownlie, was right behind them. He was in the leading tank, and had to decide quickly whether he would try to shoot past the disabled tanks, or to proceed steadily. He chose the former but crashed into Bulley’s tank. Fortunately, he could move on, and all of his tanks managed to reach the town. The tanks had been hit countless times by German heavy fire. They rode through the Wilhelminastraat and the Markt towards Ommel. Later, he would tell:
"The faster you go, the harder you can make it through, and the less the enemy can hit you. The speed was not out of recklessness. Those who go slowly often have to pay for it."
Major Hutchinson, the commander of A Squadron, followed suit, and also managed to reach the town safely. The rest of the regiment and the 4th Battalion King’s Shropshire Light Infantry then cleared the last Germans from the bridgehead and within Asten by themselves. A number of tanks advanced to Vosselen, a hamlet northwest of Asten. Here, in the late afternoon, a number of Germans were kept under fire, and a farm at the Nachtegaal (Nightingale) was lost. In the early evening, A Squadron was positioned north of Asten, C Squadron to the east, and B Squadron to the south-southwest.

A Sherman tank drives through the Wilhelminastraat in Asten Source: Photographic archive Jeroen Koppes
After the first tanks, soon the 4th King’s Shropshire Light Infantry followed, which was to break out from the Herefords bridgehead and capture Asten themselves. Major Urwin Thornburn was the commander of D Company. It was his company which would be the first tp move into Asten. He had had to step forward and take charge twice in order to help his troops forward. One of his platoon commanders was a Norwegian, Lieutenant Sverre Bratland, who had been under fire from a machine gun nest. He crawled forwards and tossed two grenades into it, taking out the rest with his Sten gun. Both men were awarded the Military Cross and survived the war. Bratland would retire from the Norwegian army as a General Major in 1982. He died in 2002.
Thornburn wrote of Bratland:
"He was never happier than when he was crawling on his stomach, and since the advance had perforce to be in single-file along the ditch, it was in very truth Jimmy who, single-handed, drove the enemy slowly back down the road. Every few minutes he would have a grenade-lobbing competition with the Germans further up the ditch, after which they gave him best and withdrew another 25 yards; and in this manner some 250 yards was cleared, sufficient to provide D Company with elbowroom for manoeuvre."
After this, the rest of the KSLI could advance as well, and captureAsten one house at a time. It would take until afternoon to get some degree of control of the town, and until evening to drive out the last Germans. The Regiment book described the manoeuvre as follows:
"The battle for Asten had been as hard as that for Antwerp, the town being defended by determined and experienced troops in powerful defence positions."
From the 2nd Fife and Forfar, Lieutenants D. W. Bulley and P. C. Firkins, and nine soldiers were killed during the channel crossing, while Captain B. L. Frewin and 8 soldiers were wounded, primarily from A Squadron. The Herefords mourned 25 deadly victims and nursed 35 wounded. The 13 Field Squadron, which had constructed the Bailey bridges, lost one man and had 4 wounded. Captain Robert Hesketh from the Herefords:
"Unfortunately five of the leading tanks were either bazooked or blown up by mines in one of the most spectacular and gallant charges ever made."
The total number of British victims (dead, wounded, and missing) is estimated at 150.
The Germans retaliate
The German losses at the bridgehead were high; the Herefords reported 90 kills. While The Proud Trooper, written by Lieutenant Brownlie, even mentions 200 victims. 250 Germans were taken prisoner. These troops were mainly from the Pionier-Ersatz-Batallion 30 and Infanterie-Ersatz-Batallion 65. Louis Heijligers from Asten remembers:
"At one side of the road, there were more than 60 German bodies. Many of them were next to each other in their positions, guns still in hand. Others were hanging in the barbed wire or were found among the crops or in the ditches. Further on there was, apart from weaponry, lots of furniture that had been used in the scaffolds. The houses were badly damaged by the thousands of bullets and grenades that had been fired."
Out of the 1110 houses in Asten, 101 were destroyed and 247 heavily damaged.
Around nightfall, there was a series of heavy counterattacks from several German units. B Squadron, south-southwest of Asten, had to endure a heavy German attack twice. This counterattack was carried out by parachutists from the Fallschirm-Jäger-Regiment Hübner from the 7th Fallschrim-Jäger-Division of Generalleutnant Wolfgang Erdmann. Major Hutchinson, therefore, had been right about the presence of parachutists.
From the north, form the direction of Ommel, another counterattack followed at 7 pm. This was carried out by SS troops from the Kampfgruppe Heinke. Some days earlier there had been an SS officer on reconnaissance on his motorbike. This afternoon, he was back, and ordered the inhabitants to clear Ommel for the battles to come. This German attack, too, was repulsed by the British.
Helmond liberated
General Roberts did not think it wise to cross the channel at Helmond. Through damage to the lock gates the water level had dropped, which would make the crossing more difficult. Besides that, he feared that a battle in a residential area would result in countless civilian casualties. Thus he decided to send his troops via the bridgehead at Asten. From this bridgehead, the 11th Armoured Division advanced towards Deurne, which was liberated on September 24th. From there, the eastern part of Helmond could be explored. Soon it was revealed that the Germans were retreating towards Bakel and Gemert, which allowed a complete liberation of Helmond on the 25th. The advance proceeded east and along the Maas, and was dubbed ‘Operation Aintree’. Its goal was to capture the terrain west of the Maas, and would result in the Battle for Overloon and Venray between September 30th and October 28th 1944.
Definitielijst
- Batallion
- Part of a regiment composed of several companies. In theory a batallion consists of 500-1,000 men.
- bazooka
- American antitank rocket launcher weapon. Rocket with shaped charge is put in a long tube which is electrically fired from the shoulder of an infantry man. The bazooka can be reloaded. The bazooka produces a large flame to the rear which makes it unsuitable for fighting from closed compartments or from homes. British counterpart is the PIAT, Projector Infantry, Anti- Tank, also a man-portable anti-tank weapon. Germany used Panzerfaust and Panzerschreck, “armour fist “ and “armour terror”.
- Brigade
- Consisted mostly of two or more regiments. Could operate independently or as part of a division. Sometimes they were part of a corps instead of a division. In theory a brigade consisted of 5,000 to 7,000 men.
- cannon
- Also known as gun. Often used to indicate different types of artillery.
- Dolle Dinsdag
- Mad Tuesday: As a result of mistaken rumours on the imminent arrival of Allied troops in the south of the Netherlands on September 5, 1944, just prior to Operation Market Garden, many German troops and Dutch collaborators started to flee, instantly causing Dutch civilians to celebrate liberation. Unfortunately, this proved premature
- Jäger
- Also called fighter plane. Fighter planes can be used for air defence (armed with guns and/or carrying guided missiles) or for tactical purposes (armed with nuclear or conventional bombs or rockets). The aircraft used for tactical purposes are also called fighter- bombers because they are bombers with the speed and manoeuvrability of a fighter. Tactical fighters, equipped with photographic equipment are also used as reconnaissance plane.
- Kampfgruppe
- Temporary military formation in the German army, composed of various units such as armoured division, infantry, artillery, anti-tank units and sometimes engineers, with a special assignment on the battlefield. These Kampfgruppen were usually named after the commander.
- Regiment
- Part of a division. A division divided into a number of regiments. In the army traditionally the name of the major organised unit of one type of weapon.
- resistance
- Resistance against the enemy. Often also with armed resources.
- Trooper
- Short for paratrooper.
Information
- Article by:
- Jeroen Koppes
- Translated by:
- Nadia Guntlisbergen
- Published on:
- 05-06-2019
- Last edit on:
- 30-09-2024
- Feedback?
- Send it!

Related themes
Related sights
Related books


Sources
- Helmonds Heem.
- Historical Records of The Herefordshire Light Infantry.
- DEENEN, W., Sluis 11 tussen Someren en Asten, 2001.
- DELAFORCE, P., The Black Bull, Pen & Sword Books Limited, Barnsley, England, 2010.
- DIDDEN, J. & SWARTS M., Einddoel Maas.
- HOEFNAGELS, T. & MAAS, T., Gevels zonder vlag, 1989.
- HOOFF, G. VAN, Kunstwerken aan De Knaal, Helmond, 2013.
- JOOSEN, W.A.L. e.a., Geschiedenis van Someren in de Tweede Wereldoorlog, Someren, 1984.
- KEMP, P.K., 4th Battalion King's Shropshire Light Infantry.
- ROBERTS, G.P.B., From the Desert to the Baltic.
- SELLAR, R.J.B., The Fife and Forfar Yeomanry 1919-1956, 1960.
- STEEL BROWNLIE, W., The Proud Trooper, Collins, London, 1964.
- ZANDEN, P. VAN DER, De slag om de Peel, 1949.
- WO 171/456; 11th Armoured Div G 44
- WO 171/691; 159th Infantry Brigade 44
- WO 171/853; 2 Fife and Forfar 1944 Jan.- Dec
- WO 171/866; 3 Royal Tank Regiment Jan-Dec 1944
- WO 171/997; 151 Ayrshire Yeomanry Field Regiment 44
- WO 171/1307; 1 Herefordshire 44
- WO 171/1326; 4 KSLI 44
- WO 171/1349; 3 Monmouthshire Regiment Jan-Dec 1944
- WO 171/1507; 13 Field Squadron 44
- WO 373/51/322; Recommendation for Award for Jackson, Robert Stennett
- WO 373/51/442; Recommendation for Award for Thornburn, Urwin
- WO 373/56/798; Recommendation for Award for Hesketh, Robert Ball
- WO 373/108/990; Recommendation for Award for Bratland, Sverre
- Advance to Victory, RHCe, 13225.
- 11th Armoured Division Drive into North Brabant, RHCe, 13225.
- Verslag van de Heer H. Gerritsen, jan. 1981, RHCe, 13225. Ref #559.
- Woningen en Boederijen verwoest tijdens de bevrijdingsdagen, nov. 1980, RHCe, 13225. Ref #555.
- Het oorlogsdagboek in het Kasteel van Heeze
- De mythe ‘slag om Arnhem’ - Kritisch historicus
- IWM, Interview Hutchinson, reel 12 19:15
- Major-General Sverre Bratland - Telegraph.
- London Gazaette, 24 January 1946.
- CWGC.
- Lexikon der Wehrmacht.
- The German Armed Forces 1918-1945, Feldgrau.com.
Looking for reliable information or news facts about WW2? Do you want to create your own battlefield tour to sights of wars from the past? Or are you interested in war medals and their recipients? TracesOfWar.com tells you more!
More information

© STIWOT, 1999-2025. All rights reserved. Privacy statement, cookies, disclaimer and copyright