The beginning: Who dares wins
The Special Air Service Brigade, in short SAS, was established in the first half of 1941 in North-Africa by Lieutenant David Stirling. The official name of the unit read: L Detachment: Special Air Service Brigade, this to lure the Germans into thinking an A up to a K Detachment also existed which wasn't the case though. L Detachment was established from the remnants of Layforce, an experimental commando unit, commanded by Lieutenant-colonel Robert Laycock. After initial training in Scotland, the unit was promised a fine operation in North-Africa where they were mostly to attack the supply lines of Rommel's Afrikakorps. Between February and April 1941, the situation had deteriorated rapidly however. Moreover, Greece and Crete were under pressure of the German Wehrmacht as well. Therefore, Layforce was scattered and the operations were not so fine at all, as had been promised. A large segment of the troops was to cover the retreat of the British from Crete and the rest was put in reserve in Cairo. Stirling was part of this reserve in the Egyptian capital and he felt bored to death. Moreover, the deployment of Layforce had failed hopelessly because out of the 800 men deployed on Crete, only 200 returned alive.
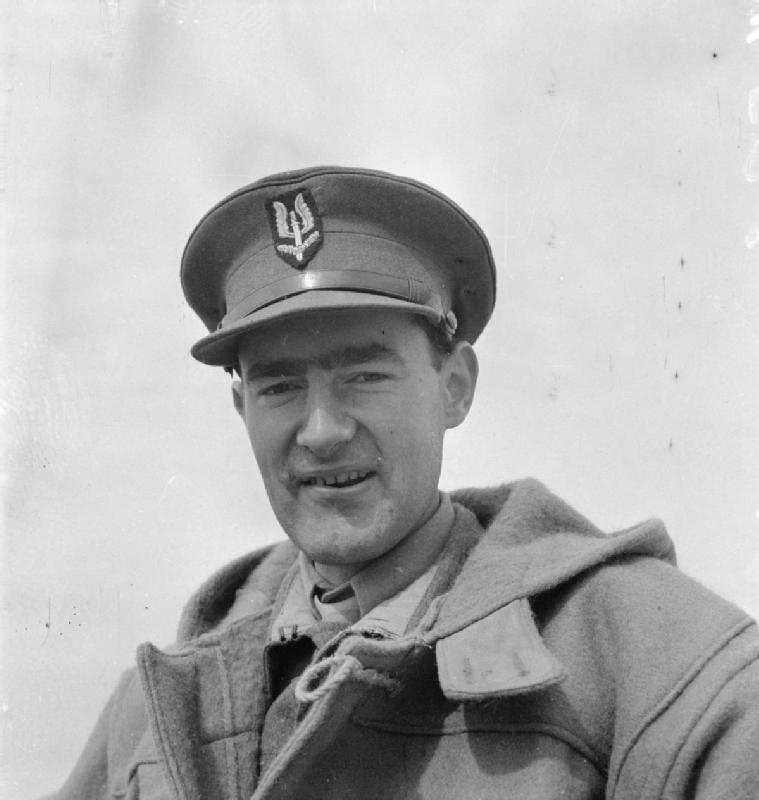
Portrait of Sir David Stirling. Source: Imperial War Museum
On a boring day, Stirling was in the officers' mess talking with Lieutenant Jock Lewes, another member of Layforce. A cooperation emerged when Lewes told him he had laid his hands on a dozen parachutes. They had been delivered to the wrong unit and were actually destined for India. When Lewes received the lot, Layforce gave permission to train for parachute jumps in the desert. Stirling wanted to come with him and Lewes agreed. Both men were bent on action and thought the commando unit was being deployed poorly. After Stirling had fractured both legs when his parachute failed to open, it took eight weeks before he could walk again. During that period, Stirling and Lewes kept in touch and the latter told Lewes of his plans. His plan called for the establishment of a unit with small operational groups that were to harass the enemy behind the front.
Stirling, a Scotsman, was a man of action and that is exactly how he presented his plan to the high brass at Middle East Headquarters. He went to HQ on crutches, which was natural with his broken legs of a few months back and ran off as soon as he had passed the guard. He hurried to the room of the deputy Chief of Staff, General Sir Neil Richie and gave him a piece of paper with the main points of his plan. The general browsed the paper and got fascinated. He ordered to lend Stirling all support he needed and moreover, he invited him for a second talk, this time with the C-i-C, General Claude Auchinleck. It must be said that Auchinleck was Scottish as well and both families were befriended. At the time, this was an important bit of information as connections between certain families could open doors.
Auchinleck and Ritchie permitted Stirling to start an experiment with six officers and 60 ranks. He was allowed to recruit these men from the remnants of Layforce. Of all these recruits, Jock Lewes was the most important as he, together with Stirling, was the driving force behind the SAS. In addition, Lewes took several men along with whom he had launched several small scale attacks behind enemy lines in the past. These recruits formed the basis of the SAS throughout the war and later. Each of them eventually occupied key positions and so maintained the high standard of the SAS. Therefore it is a good idea to introduce some of them briefly.
Definitielijst
- Brigade
- Consisted mostly of two or more regiments. Could operate independently or as part of a division. Sometimes they were part of a corps instead of a division. In theory a brigade consisted of 5,000 to 7,000 men.
- Wehrmacht
- German armed military forces, divided in ground forces, air force and navy.
The most important recruits
Sergeant Pat Riley was an American who had gone to England in the twenties. He kept his American nationality and consequently he was drafted into the army when America was drawn into the war. However, he falsified his birth certificate so he could join the British army carrying a phony British citizenship. Riley ended up in Layforce in a roundabout way where he was well liked for his charismatic attitude. This persuaded others to join the SAS, together with Riley. He took Sergeant Jim Almonds who had seen action earlier at Tobruk, along with Lewes. Jim was noticed there as he had taken an injured soldier to safety in the heat of battle. With Pat and Jim, two senior NCO's were appointed Stirling and Lewes could rely on.
Stirling also recruited a number of important men. He didn't say much about the goal of the group, except that they would be dropped behind enemy lines. He interviewed all applicants personally because he knew what type of man he needed. He looked for real adventurers, men who thought and acted independently, who were willing to kill a person man to man when needed.
Private Johnny Cooper was the youngest man recruited by Stirling. Cooper was extremely stubborn despite his 19 years and he never complained about bad situations. Exactly what Stirling was looking for. In addition he also encountered Reg Seekings, a coarsely built man with a hot temperament. Reg was very loyal to the men in his unit and apart from that, was more than willing to take waging war a step further than many others. He was of the opinion that any discussion should be solved with his fists, something he was familiar with, being an amateur boxing champion.
Apart from Lewes, Stirling needed another five officers. Lieutenant Bill Fraser was the first. He had earned his salt in helping defend the territory of Vichy-France. During the process he was shot in the face but the bullet ricocheted off the clasp of his helmet around his chin. Fraser possessed fine qualities of leadership and with his experience he could put them to good use. Lieutenant Eoin McGonigal was the next to be drafted. He already served with the commandoes. Next in line were the lieutenants Peter Thomas and Charles Bonnington. The last one was also the most colorful, Lieutenant Robert (Paddy) Mayne. Paddy was shy at first sight but he had an enormous temperament which manifested itself violently, in particular when he was drunk. He had gained a vast experience in Vichy-France where he was honored for his fine qualities of leadership, for achieving all his goals and for taking massive numbers of prisoners. Mayne held people from the higher classes in low esteem so Stirling had to win his confidence first. Paddy was a complicated man but Stirling considered him a great leader and therefore dared to take a chance.
All these men must be named, not only because they had stood at the cradle of the SAS but also because in the years after 1941, they had left an indelible impression of what they meant to the unit. These men as well went through a team building process and certainly because of the temperament of for instance Mayne and Seekings, that wasn't always easy. However, if something was demanded of the men, they stood by each other and personal differences faded into the background. At the end of the day, a very close team was knit of independent, creative and very courageous soldiers who could make life very hard for the Germans. Stirling managed to maintain his role as natural leader by being the first to execute all exercises like bailing out of a low flying airplane.
In the newly formed SAS, everyone took the same training regardless of rank, something very unusual in those days. On October 21, 1941, the men made their first parachute jumps in preparation for future missions. Stirling had learned a lesson from his accident and selected another airplane, the Bristol Bombay to make jumping safer. Parachuting being still dangerous became obvious immediately when the chutes of Ken Warburton and Joe Duffy failed to open and they fell to their death. This was a severe shock for all men and officers but they had to continue. Therefore Jock Lewes arranged a funeral and informed the group that the two men had died because the parachute lines had become entangled. The mistake was corrected and everybody was summoned to jump the next morning. No one drew back and all men, from high to low made the jump. Stirling was the first to bail out and all others followed suit; no one was hurt. In addition to para jumping, Jock Lewes applied a training method with very high standards. He accepted mistakes from no one and demanded the utmost of each recruit. This led to a considerable number of drop-outs but because of the mythical status the unit had already gained, it gradually became easier to find new, good recruits.
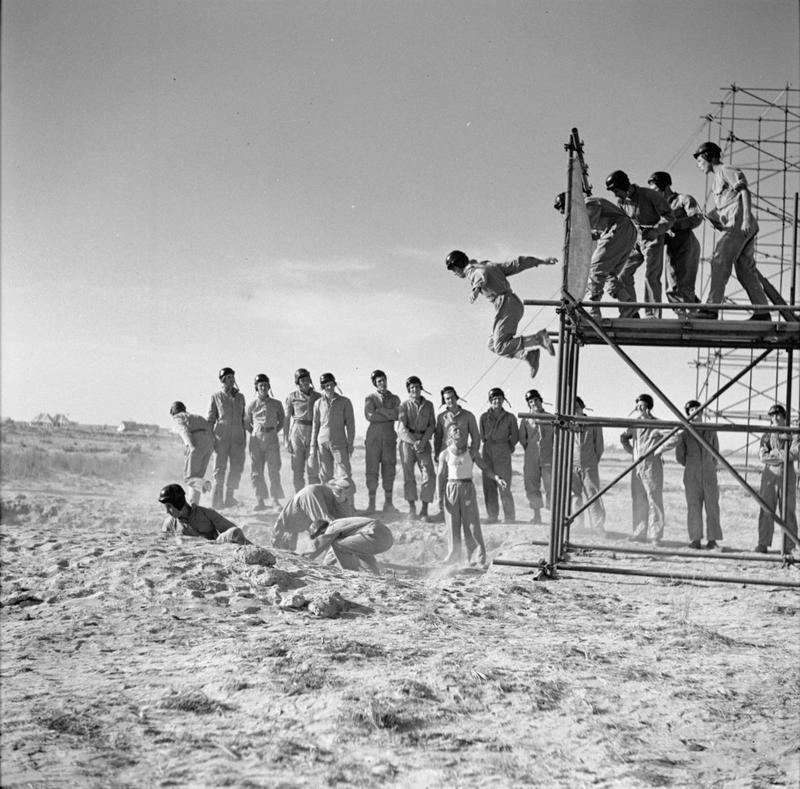
Training parachute jumps near Kabrit Source: Imperial War Museum
The motto and the logo
Stirling had also asked the men to think about an emblem and a slogan. The slogan eventually became: ‘Who Dares Wins’ and the emblem was drafted by Bob Tait, a sergeant within the SAS. He drew Excalibur, the burning sword of King Arthur. Later on, this logo was often misinterpreted as a winged dagger. Whatever the case, the emblem was attached to a gray beret, their own unique color. The beret used to be white but this caused confusion with other British units; it is unclear why. Finally, the SAS needed its own parachute wing. That would be worn proudly on completion of the parachute training. The wing was designed by Jock Lewes with the traditional parachute in the center but with the wings of a leafhopper beetle. This unique wing is still in use today and is also in memory of Jock Lewes. After some successful operations, Stirling felt that the right of existence was guaranteed and the insignia could be standardized and introduced.
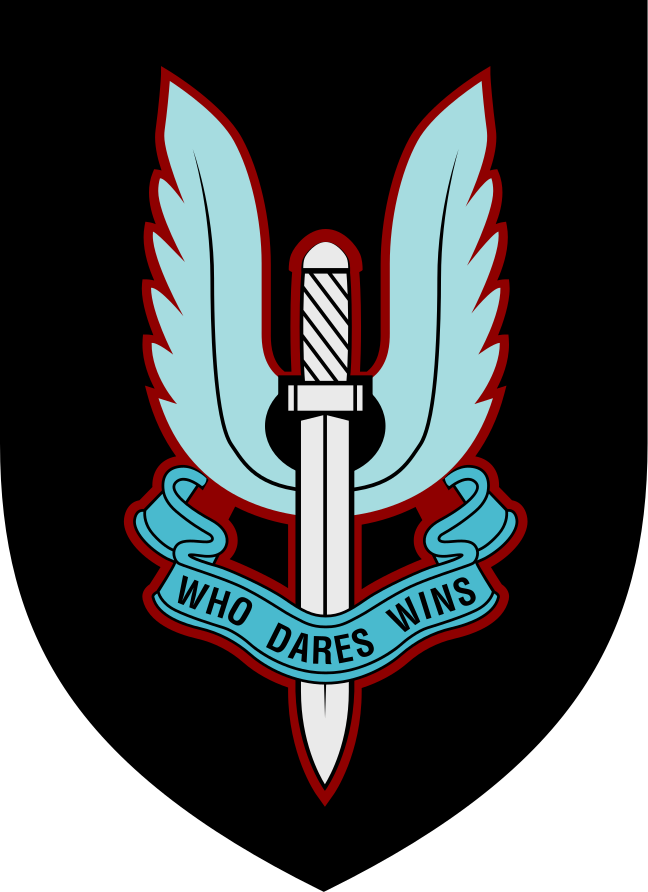
The original SAS logo Source: Wikimedia Commons
The new unit got a test mission as Stirling entered into a bet with a British air force captain. He didn't believe a British airfield could be penetrated unnoticed and Stirling was sure his men would succeed. With five small groups, the test mission was started to infiltrate Heliopolis air base unseen. They managed to slip through the fence unnoticed and stuck dozens of stickers on aircraft. Subsequently, the men managed to get away unseen. A salient detail of this test mission was that the guards of the air base hadn't been informed. The men could have been fired upon if discovered. Fortunately, this didn't happen and Stirling won his bet.
The SAS, which would initially operate on enemy air fields, had no suitable explosives yet to destroy aircraft. The standard time bombs were too heavy and therefore Jock Lewes came up with a new invention: the Lewes bomb. This was a sticky time bomb much lighter than the normal ones and moreover, they were inconspicuous once stuck on an airplane. Another example was that the bomb could be placed very precisely with a destructive effect if placed near fuel tanks or ammunition. The Lewes bomb became very important for the SAS throughout the remainder of the war.
First operation
The first operation of the SAS was scheduled for November 18, 1941, when General Claude Auchinleck launched Operation Crusader. Stirling and the men of L Detachment SAS Brigade were ordered to fly to the landing zone in the night prior to the attack. The pilots would recognize the zone by bonfires, lit by a preliminary bombardment on airfields in the vicinity. Stirling’s 55 men were split into five groups of 11 each. They were ordered to find their way after landing to five forward airfields in the vicinity of Gazala. On arrival on the fields, they were to destroy as many out of the 300 aircraft as possible with the Lewes bombs. On completion of the mission, the men were to march some 50 miles inland and the famous Long Range Desert Group would pick them up on a designated location. The LRDG would wait for them for three days and then leave. Every man arriving after these three days would have to try and make it through the desert on his own.
This first mission was important because Stirling wanted to prove his unit to the British generals. He was still afraid that the risky mission was considered some sort of cynical method to disband the unit. However, this was exactly the kind of operation Stirling had envisaged all the time. He wanted to penetrate deep behind the lines and create chaos among the enemy with small groups of capable military.
The five groups were commanded by Stirling, Mayne, Lewes, McGonigal and Bonington. Unfortunately, the operation had a bad start. Stirling’s group landed in the zone all but smoothly. He lost two men by respectively a broken back and two fractured ankles. Men unable to walk were left behind. A third disappeared and had probably died on landing. In addition, the containers with explosives, food and the machineguns had disappeared as well. Hence, Stirling’s men were armed with just a few grenades and revolvers. Mayne had little luck as well. He lost two men from injuries, who were unable to walk, and also lost most of the containers with supplies. Yet, Mayne still had two containers, in any case better than nothing at all. Lewes and his men managed to suffer the least damage out of the five groups and could continue his operation. The airplane carrying Bonnington’s group was damaged by anti-aircraft fire and forced to make an emergency landing. All members of the group, including Bonnington were made prisoners-of-war. Eoin McGonigal’s group was out of luck during the landing as well. McGonigal broke his neck and died and his group wandered around and was taken prisoner as well.
In the end, the groups of Mayne and Lewes had to abort their mission as well because it was raining so heavily the Lewes bombs had become unusable. They were unable to blow up any planes. Once back on the assembly point, it became clear that many men had been made prisoners-of-war. After the previous two groups, a large segment of Stirling’s group was also taken prisoner by the Germans. Stirling did manage to return however with Sergeant Tait. The men of L Detachment were awaited by the LRDG that would take them back to safety. Operation Squatter had ended in disaster. Without having fired a single shot, only 21 out of the original 52 men returned. The others were taken prisoner, were missing, dead or injured.
Definitielijst
- Brigade
- Consisted mostly of two or more regiments. Could operate independently or as part of a division. Sometimes they were part of a corps instead of a division. In theory a brigade consisted of 5,000 to 7,000 men.
Driven to the targets by the LRDG
After the failure of the first operation Stirling was afraid, and rightly so, that the SAS would be disbanded but because of Operation Crusader, the top brass of Eighth Army had something else on their minds. Stirling gradually let go of the idea of carrying out operations with aircraft. Cooperation with the LRDG proceeded quite smoothly and it therefore could probably bring more luck at the start of operations. The next mission was planned and just had to succeed to prevent the SAS from being disbanded. (second operation on the map at the bottom of this article). The new plan was scheduled for December 14, 1941 and called for an attack on the airfields of Sirte, El Agheila and Agedabia by three groups commanded by Stirling, Lewes and Fraser. This time the groups were not flown to the target but driven there by the LRDG.
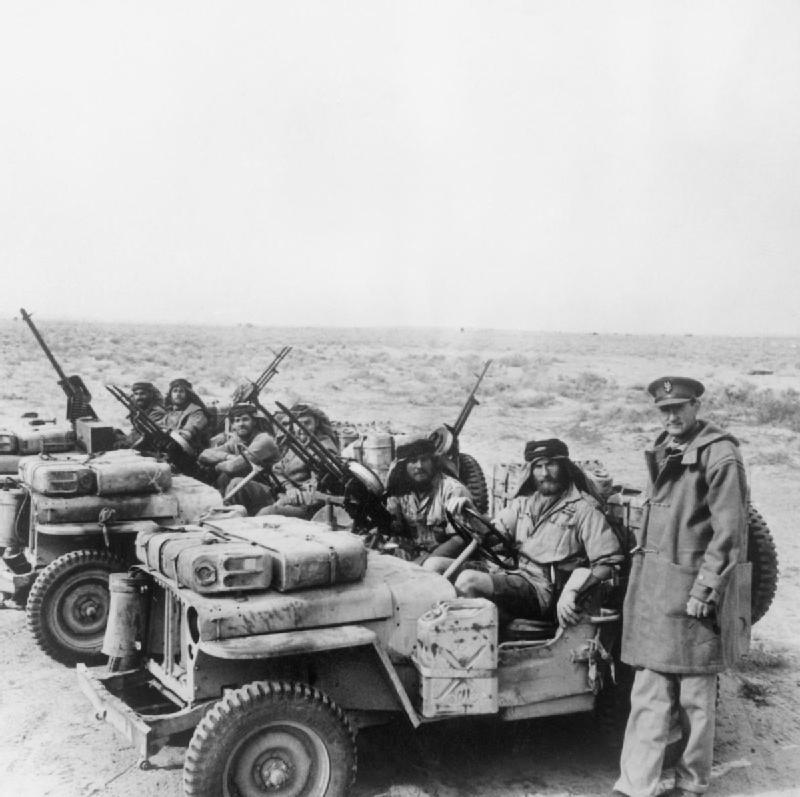
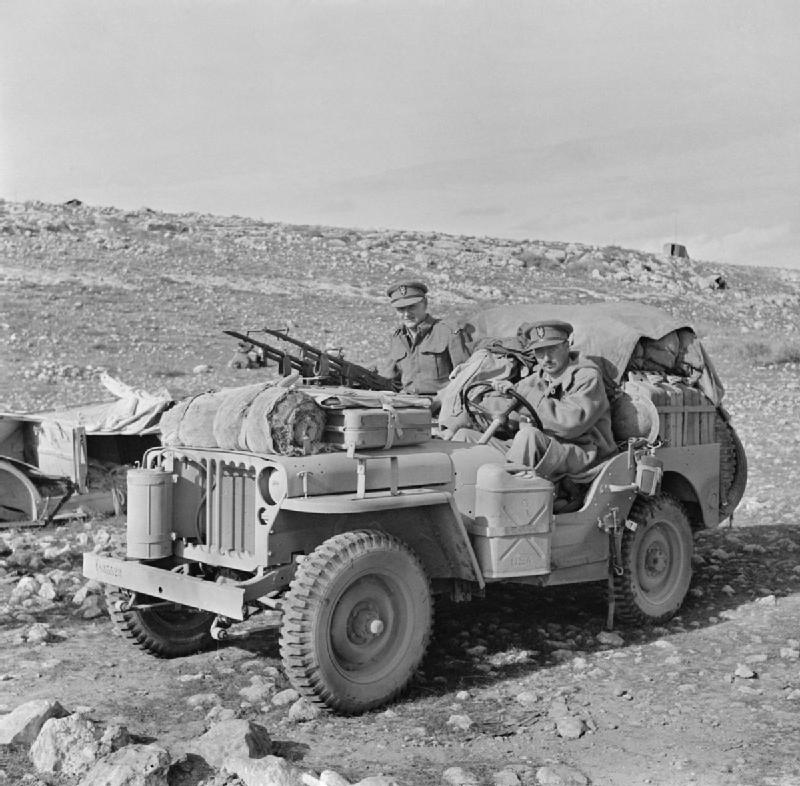
David Stirling posing in front of his jeeps with his men Source: Imperial War Museum
The journey to the target lasted no less than six days and was anything but comfortable. Sleeping was difficult and the trucks of the LRDG frequently suffered flat tires or other mechanical mishaps. Moreover, some of the men together in one group couldn't stand each other at all such as Reg Seekings and Johnny Cooper in Stirling’s group. Prior to departure some men avoided that the two would crack each other’s skull but the tension was almost visible throughout the journey. Within the LRDG, the SAS encountered another man who was to become important in the history of the regiment: Mike Sadler. He was the navigator of the LRDG and possessed a great talent. Men of the LRDG could drive in the dark without lights thanks to the compass and sense of direction of Mike Sadler, which made them considerably less vulnerable to attacks from the air.
Once they arrived at a point some four miles from Sirte airfield, Stirling split his group in two: one group commanded by himself, the other by Paddy Mayne. Stirling was to attack Sirte whereas Mayne would attack Tamet, an airfield somewhat further west. On Sirte airbase, the group observed a large number of Italian aircraft parked there but during the day, only a few remained behind. The LRDG had been attacked during the day and this must have alerted the airbase that an attack was imminent. Stirling and his men returned to the assembly area empty handed where the LRDG would pick them up again. Meanwhile, Paddy Mayne was more successful. He managed to enter the base unseen where a few dozen planes were parked. They also heard a group of Germans and Italians having a party. They decided to disrupt it in typical British fashion by storming in, yelling ‘good evening’ and subsequently shooting all those present. Next they smashed the controls of 10 aircraft by rifle fire and managed to place Lewes bombs on 14 aircraft. In addition they managed to place these bombs in a ammunitions dump, on a telegraph pole and in a fuel depot. The operation was a great success for Paddy Mayne and he and his group could return to the assembly area.
The assault group commanded by Lewes made its way to an airfield near El Agheila where to their great dismay they found no airplanes. Lewes didn't give up and blew all telephone poles and in addition, they found two trucks which they blew up as well. Next they stumbled onto a group of indigenous soldiers connected to the Italian army but they surrendered immediately. Thereafter, Lewes thought up a cunning plan with one of the captured Italian Lancia trucks of the LRDG convoy which had taken them there. Based on intelligence reports, he knew there was a large parking lot near Mersa Brega for military vehicles, including a mess that was often visited by high ranking German and Italian officers. On the way to Mersa Brega they managed to overtake 47 vehicles without being found out. The group arrived at the parking lot and counted 27 vehicles. They were addressed by an Italian soldier who was bound securely and thrown into one of the British vehicles. Thereafter the group set about placing Lewes bombs on all vehicles and soon a fierce fire fight erupted. The Germans and Italians fired at random because they had no idea what was actually going on. After the fight had lasted 20 minutes, the group returned to the British trucks to return to the assembly area.
Bill Fraser’s assault group had targeted Agedabia airfield and was the last group that would launch an attack. The LRDG dropped them off at 16 miles from target and they set off in the direction of the airbase. Fraser’s group consisted of just five men and from an observation point, they counted 39 aircraft. They managed to penetrate unseen and placed Lewes bombs on 37 aircraft and an ammunition dump. The five men were on their way to the assembly area when the bombs exploded turning aircraft and depot into a raging fire. Fraser had proved he could disrupt an entire military airbase with just five men.
Success of this operation was not only important for the SAS but also for the relationship between Reg Seekings and Johnny Cooper. Owing to the successful raid on Tamet, the two learned to trust the other blindly and they highly respected each other. After this mission the pair was always side by side. These very risky missions resulted in a tightly knit group of men who would really stand by each other, whatever the differences. The raids on Tamet, Sirte and Agedabia had all succeeded without the loss of a single man. With these missions, L Detachment proved small groups were able to inflict massive damage. They not only lend service to the British war machine in North-Africa but also justified their existence.
SAS military in their jeeps Source: Imperial War Museum
Definitielijst
- raid
- Fast military raid in enemy territory
- regiment
- Part of a division. A division divided into a number of regiments. In the army traditionally the name of the major organised unit of one type of weapon.
Success in a new operation
The men of the SAS had little time to rest because Stirling had already determined his next targets They were to attack with the same three groups as before, led by Lewes, Fraser and Stirling and Mayne. (3rd operation on the map at the bottom). Fraser was to attack an airbase near the Arco del Fileni or Marble Arch as the British called it, a large stone arch which had been constructed by order of Mussolini to mark the border between Tripolitania and Cyrenaica. Lewes was to attack the airbase of Nofilia, a little further away from Marble Arch. Stirling and Mayne decided to attack the airfields of Tamet and Sirte once again because the enemy there would be surprised by the quick second attack.
Stirling had bad luck again as he hadn't reckoned with the advance of an entire German armed division on the way to the front at the moment of attack, precisely along the road he needed to get to Sirte airbase. He had to abort his attack once more and decided to blow up some German trucks with supplies on the way back. Nonetheless, Stirling enjoyed the questionable honor to be the only British officer who hadn't inflicted any serious damage yet to German or Italian war equipment. Mayne had more success and succeeded once again in setting Sirte airbase ablaze.
Lewes and his team arrived at Nofilia and counted 43 brand new STUKA’s, the notorious German Junkers Ju-87 dive bombers. They would launch the attack by night and so they had to wait until darkness. When the group finally went to work at the airbase, they realized that only two STUKA’s had remained and the others had all gone. Disillusioned, the group returned to the rendezvous
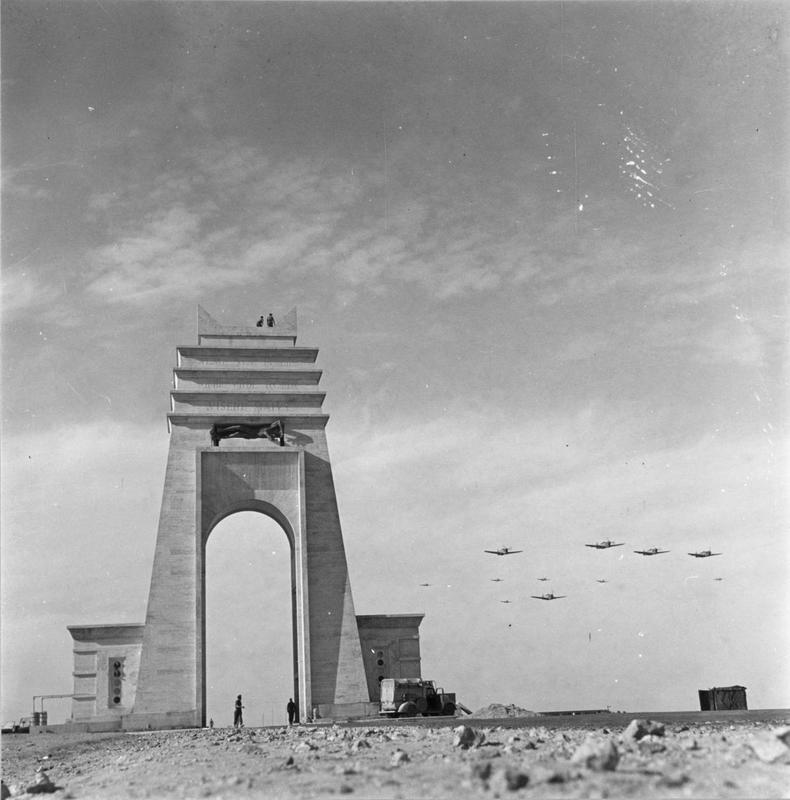
Arco dei Fileni (Marble Arch) Source: Imperial War Museum
The return of Lewes’ group proceeded anything but quietly because on the outward journey they were spotted by a Messerschmidt Me-110, a German fighter bomber. Equipped with four machineguns and two 22mm cannon, the aircraft started strafing Lewes’ convoy. A little later, the Me-110 disappeared but was replaced by three STUKA’s which plagued the convoy for hours. Afterwards, a reconnaissance plane appeared to assess the damage. The men kept absolutely quiet, the plane disappeared after a while and the attack was over. Although Jim Almonds had opened fire on all aircraft and had inflicted losses on German side, the group itself had suffered a severe loss as well. Jock Lewes had been mortally hit during the attack in his back and his thigh, causing him to bleed to death in a few minutes. He was buried in a shallow grave and his rifle with his name and helmet were placed over it. Lewes’ grave has never been found.
After the air raid, Almonds took command of Lewes’ group and with a bit of luck, they got one of the LRDG vehicles working again after which they drove back to the rendezvous. Once there, everybody was quite shocked about the loss of Lewes. This was especially true for Stirling because he and Lewes had both stood at the cradle of the SAS. On their return to the camp he called the unit together and conducted a short ceremony in honor of Lewes in whose tent a letter from his girlfriend was waiting in which she accepted his marriage proposal
Fraser had little luck with his attack as the air strip as Arco del Fileni was heavily defended. There were fences and a lot of very alert guards. Therefore Fraser saw no opportunity to infiltrate. Moreover, he had no idea of what had happened to Lewes’ group. As the vehicles were not at the rendezvous, there was nothing left for Fraser and his men other than a long return march on foot. They had little or no supplies for their return and in the end, they drank urine and ate snails and lizards. After a long march, having confiscated a German vehicle on the way, they returned to British turf in ten days. Subsequently, the group was flown back to Kabrit where SAS HQ was located. On arrival they received a warm welcome as everyone thought the group had been taken prisoner or everyone was dead. They were so firmly convinced of this that a new officer, Scottish lieutenant Fitzroy MacLean wanted to occupy Fraser’s tent. When he walked in, he stumbled upon a bearded Fraser who had just returned from his long survival trip.
Despite Lewes’ death, the operation was a great success. Stirling’s men had destroyed over 90 enemy aircraft, a number that could change the impact of an attack. Auchinleck, the highest boss at the British front, did recognize this as well. Based on the number mentioned above, he voiced high praise for the actions of L Detachment and permitted Stirling to recruit another six officers and 40 ranks. Moreover, Stirling was promoted to Major and his buddy, Mayne to Captain. Both men were also nominated for a DSO and Bill Fraser for a MC. This meant the ultimate recognition for the men of the SAS. Owing to the highly dangerous operations, they had become an important link in the British war machine in North-Africa
Definitielijst
- cannon
- Also known as gun. Often used to indicate different types of artillery.
- raid
- Fast military raid in enemy territory
Raid on Bouerat
After the great breakthrough, it became time to plan the next operation and this time Stirling wanted to launch the first amphibious operation of the SAS. This by the way was done in typical Stirling fashion because he preferred to do so with lots of people and beer around. The scene could probably have looked like a party. The target of the operation was to be Bouerat, a port important for the supply of Rommel’s Panzerarmee, the fourth operation on the map at the bottom. In the harbor, they were to inflict as much damage as possible with mines. In the end, this operation ended in a meagre success. The reason: on the way out the convoy was spotted by an Italian reconnaissance plane. Subsequently, they came under attack by six fighters, fortunately no victims but the radio truck was irreparably damaged in the process. Despite communication being impossible any longer, the operation continued. Once in the outskirts of Bouerat, the men split up in three groups. The city seemed to be undefended and empty but it was important for the men not to be discovered as they were now working 310 miles behind the front. One mistake could be fatal. In the port they discovered only fishing vessels and not the tankers they had hoped to find. In the warehouses around the harbor though, they found various spare parts and a few dozen trucks carrying fuel. Moreover, there was a wireless communication station. The men placed explosives everywhere and left the city quickly; 20 minutes later the harbor was a blazing inferno.
Despite the successful raid on Bouerat Stirling had no idea, because of the lack of the radio truck, that Erwin Rommel had recaptured much terrain from the British. Consequently Bouerat was now far less important than the port of Benghazi, further east had become much more important for Rommel. It took two weeks for the convoy to return to Kabrit, the base camp.
Around this time, the SAS received reinforcement with 52 parachutists from the army of the Free French. Paddy Mayne was tasked with training the newcomers in everything that was considered important at that time: waging war in the desert, survival, parachute jumps etc. The relation between the French and the British was tense, to say the least and got worse due to the language barrier, but both groups faced the same enemy. They agreed that French and British would operate in separate groups, commanded by Stirling.
Definitielijst
- raid
- Fast military raid in enemy territory
Raid on Benghazi
Benghazi became the new important target for the SAS as the port was actually the jugular vein of Rommel’s Panzerarmee (fifth operation on the map at the bottom). The advantage for the Special Forces was that the city was crowded with soldiers from all sorts of nationalities. Therefore, a possible operation inside the city would be less conspicuous. Owing to Rommel’s recent advance in the beginning of 1942, Auchinleck could use a little success. Churchill became impatient and so, Stirling got the go ahead to attack Benghazi and to create as much chaos and destruction in the town as possible. A powerful army truck was used Stirling could drive into the city personally. From above, the vehicle looked like a German staff car, painted as it was in the typical grey color of the Wehrmacht. They even had omitted the German signals on the hood to avoid air attacks by their own air force. The jump-off point for the attack was a mountain range, 40 miles south of Benghazi. Due to the wet climate, there were lots of shrubs where the operation could be prepared in secret.
The first attack from the mountains ended in failure. Only Paddy Mayne’s group managed to destroy 15 aircraft. This first attack however yielded much valuable information so it could be considered more like a reconnaissance mission. Stirling planned a new attack, using the discovery of new information to the effect that the Germans and Italians were completely unprepared for an attack such as the SAS preferred to carry out. So he decided to simply drive into town and create as much mayhem as possible.
So it came to pass that on May 21, 1942, 12 men of the SAS were driving in the direction of Benghazi in a captured German car. They were stopped at a checkpoint by an Italian soldier who looked at the car somewhat suspiciously but he waved the men through, warning them they should dim their headlights. Driving on didn't go smoothly as the bearings of the wheels of the car were rather worn down, causing the vehicle to make a loud squeaking noise when in motion. There could be no question though of entering the town stealthily. Moreover, close to Benghazi they were pursued by two German vehicles that had turned around when the British had overtaken them. A cat-and-mouse game through Benghazi followed and the British eventually managed to shake off the Germans. They took an inflatable boat from the car and dragged it to the edge of the quay in order to inflate it there. The boat had a puncture and a second one had been punctured as well. The activity with the boats on the quay was noticed and therefore a harbor guard turned up to find out what was happening. Fitzroy MacLean was the only one who spoke Italian and he bluffed his way out of the situation by yelling at the man. At daybreak, the men found an abandoned apartment to catch some sleep. The next night, the men attempted once again to place bombs but the security in the harbor had been tightened. They had no other option than to turn around and head for the rendezvous.
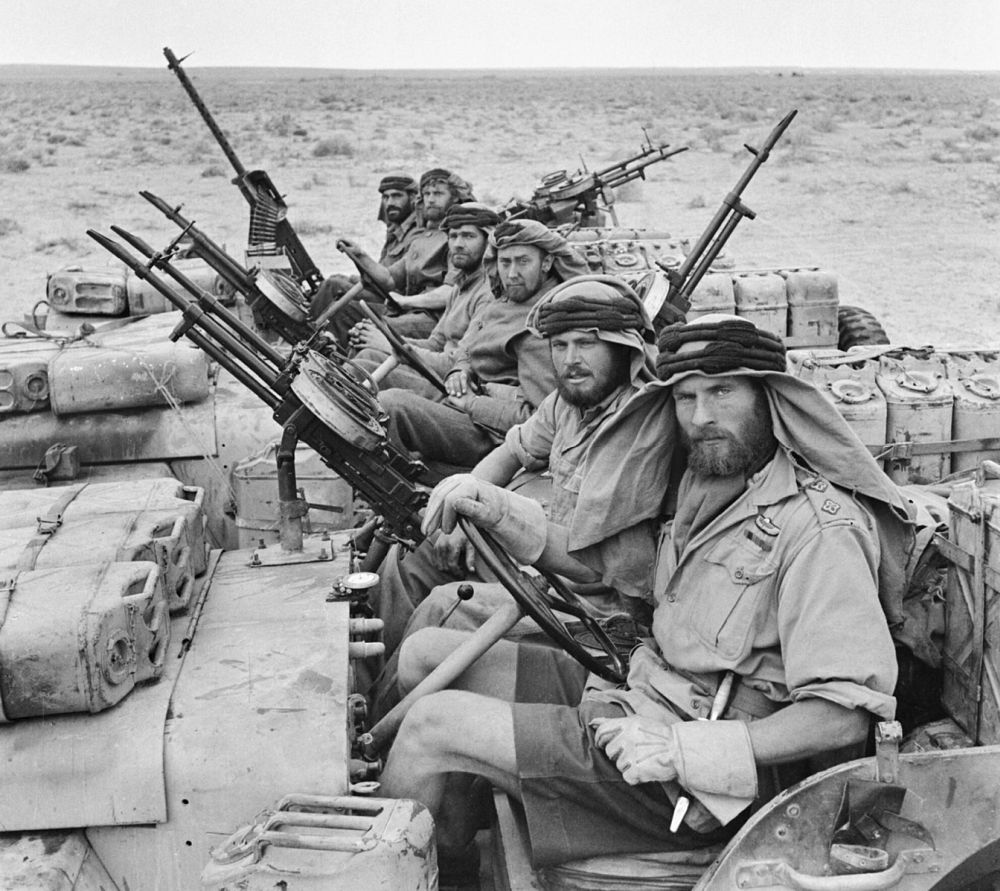
SAS-military in their jeeps Source: Imperial War Museum
Although the mission had failed, it did have an important end. On the way back, Stirling had to drive himself because the LRDG had left already (after all, the men were 24 hours too late). Stirling was a bad driver though and often drove much too fast and this time was no exception. He caused an accident resulting in all men being severely injured (fractured wrists, vertebrae etc.). Moreover, one man died from his injuries. It was a sad ending to a mission that in principle had yielded little, or did it? Churchill’s son Randolph was part of the group. In a letter to his father, he wrote about the mission and that made the SAS appear on the radar of Britain’s highest political leader. Exactly this led to the support from higher up, Stirling had been looking for so long.
Definitielijst
- radar
- English abbreviation meaning: Radio Detection And Ranging. System to detect the presence, distance, speed and direction of an object, such as ships and airplanes, using electromagnetic waves.
- Wehrmacht
- German armed military forces, divided in ground forces, air force and navy.
Raids on the northeastern coast of Libya
The next mission took not long in coming as Auchinleck needed the men of L Detachment to support his troops in their counterattack. Preparatory work for the attack was done by Cooper and Seekings who had both been promoted to sergeant. The goal was to attack six airbases in the region of Benghazi and a seventh on Crete, Heraklion. Meanwhile Mike Sadler planned the route and arranged the necessary fuel to reach the various targets. On the map at the bottom this operation is marked as the sixth.
Up to this moment, the men of the SAS had no medical officer at their disposal who was sorely needed because some men suffered from injuries that wouldn't heal. Therefore Stirling sent out feelers for a medical officer in the SAS and Malcolm Pleydell reacted. He had no idea what he was getting into in early June 1942. The only things he knew were that the men shared little information with other units and carried out short operations. He therefore expected a unit that was very rigid but nothing was further from the truth. He met Stirling who immediately started talking to him in a friendly way. Pleydell soon felt at home and was quickly persuaded to stay. The medical officer was a fervent diary writer as well and so after his arrival the stories of the SAS are rather well documented. Pleydell arrived precisely at the right moment when Stirling was selecting the targets of the new attack.
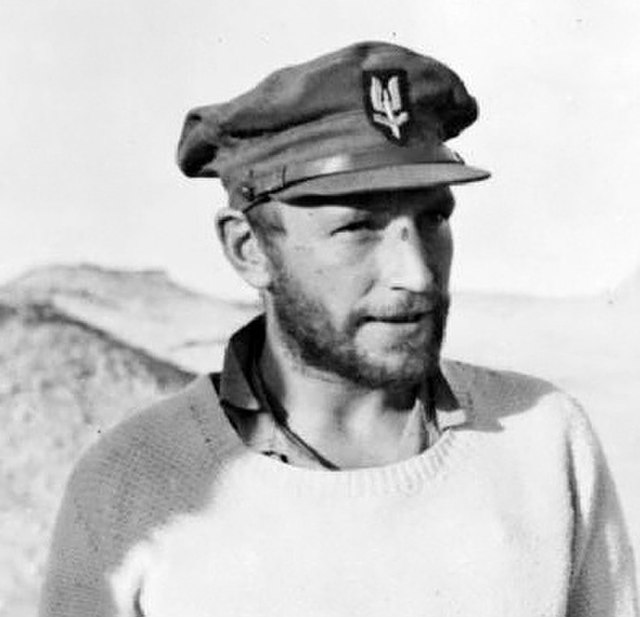
Robert Paddy Mayne Source: Wikimedia Commons
Mayne was to attack the satellite airport of Berka on which he had already inflicted considerable damage in an earlier action. In cooperation with Cooper and Seeking, Stirling himself would attack the airfield of Benina which they assumed was the most important repair shop of the Luftwaffe. In addition, various French units would attack the airfield of Barce, Derna, Martuba and the largest hangar on Berka. A fifth French unit, commanded by George Bergé, the commander of the paras, would attack Heraklion airport on Crete.
Although the operation of June 13, 1942 was very complex (seven units attacking seven different targets), the goal was simple: destroy as much enemy equipment as possible. The French units which would attack Derna and Martuba would need additional disguise and camouflage as they would pass through territory crowded with enemy soldiers. Herbert Buck, in the rank of captain who spoke German fluently and who had escaped from a German Pow camp, had the answer. He suggested to form a small unit of German speaking soldiers which could operate far behind the front. In principle, this unit was independent of the SAS but for this specific operation, Stirling had deployed these men to help the French units reach their goal.
Stirling’s unit was very successful on Benina and managed to destroy much German (reserve) equipment. Moreover they discovered a small house with some 20 Germans inside and they threw a grenade into it. It is unclear how many victims this caused but it is certain Stirling and his men managed to get away unnoticed. The French unit which was to attack Barce airfield managed to blow up several fuel depots. The French unit sent to Berka managed to destroy six aircraft and was discovered at an early stage by the guards. Nevertheless, they managed to escape unscathed.
Georges Bergé’s unit managed to reach Crete successfully and placed Lewes bombs on all Junkers bombers. After a short engagement with the German occupier they managed to escape. Unfortunately they were discovered 24 hours later but two men were able to escape. The other members of the unit were made prisoner-of-war. Moreover, the next day the Germans carried out reprisals as they assumed that Cretan resistance had been involved in the attack. Although this wasn't the case, 50 civilians of Heraklion were executed at random.
The French unit which was to attack Derna airbase drove in that direction along with Herbert Buck’s group. On arrival at Derna, one unit would attack Derna and another the smaller Martuba airfield nearby. However, one of the French soldiers was a former member of the French Legion des Étrangers and was made a prisoner-of-war later on by members of the Afrikakorps. There he claimed to be anti-Nazi and wanted to fight his former patrons. This man, Herbert Brückner, alerted the guards at Derna to the imminent danger, informing them that he had to arrest this group with as many man as possible. And so it happened, causing the operations at Derna and Martuba to fail because of a defector. In the end, Brückner turned out to be not so rebellious as assumed because later on, he was awarded the Deutsches Kreuz.
This time, once more luck wasn't on the side of Paddy Mayne. He arrived at Berka airfield a little later than the French so his operation was doomed to fail. Nevertheless, they managed to blow a fuel depot after which they were pursued. This caused Mayne’s troops to scatter. In the end, one of his men was reported missing but everyone else managed to return to base.
There was a sound rivalry between Mayne and Stirling and this time it was Mayne who got the short end of the stick. Mayne and Stirling sometimes went into battle together whereby the recklessness of both men really popped up. For instance, the two went on an extremely dangerous tour of destruction shortly after the operations against the airfields. Cooper, Seekings, Lilly and Kahane were present as well. The latter was a member of Herbert Buck’s group and spoke German fluently. With much ado they attempted to bypass a first road block but the German guard remained suspicious of the group in the car. They spun a story of having fought the British for 70 hours on end and had confiscated a car. They wanted rest and therefore to drive on. When the German guard didn't let them pass, Mayne cocked his pistol with a loud click. The German heard it too and, counting his blessings, he let them pass as he knew he would be the first to die. Afterwards, the group crashed through an Italian road block which had been alerted by the Germans. In the end they managed to blow up several trucks, a fuel depot and a soldier’s mess and subsequently turned around. They were pursued by a German armored vehicle. Eventually they managed to shake it off and return to the rendezvous. Before they arrived, the ignitor of one of the bombs caught fire. Lilly discovered it in the nick of time, enabling all occupants to get out.
In hindsight, the mission of the SAS wasn't a downright success. Some groups managed to cause considerable damage to German-Italian equipment but other groups were hardly able, or not at all, to destroy anything due to circumstances. Nevertheless, the missions had an enormous strategic importance. The SAS was noticed more and more by the Axis Powers and evoked fear. Moreover, valuable supplies went up in smoke and troops were deployed to chase the men, making deployment at the front impossible.
In the middle 1942, the tide turned dangerously to Rommel’s advantage. He stood very close to the important city of Alexandria but this also implied a serious disadvantage: his supply lines were overstretched.
As from June 1942, the SAS became more independent as the unit received 12 brand new American jeeps, armed with Vickers machineguns. This meant the support of the LRDG was no longer needed. Mike Sadler was persuaded however to join the SAS so Stirling had an excellent navigator at his disposal. Every important enemy airbase had been attacked at least once and now, Stirling wanted to deploy his SAS in an even more independent role. The strategic situation helped to take on this role. As Stirling said it himself: ’From this point, we really started to exercise our muscularity.’
Definitielijst
- Luftwaffe
- German air force.
- Nazi
- Abbreviation of a national socialist.
- Pow
- Prisoner of War.
- resistance
- Resistance against the enemy. Often also with armed resources.
Raids between Tobruk and El Alamein
The next targets were two airfields in the vicinity of Fuka, close to Alexandria and the airfield of Bagush, a few dozen miles east of Fuka. The Fuka airfields would be attacked by the French and a small unit commanded by Bill Fraser. Bagush airfield was attacked by a relatively large unit commanded by Mayne and Stirling. The leader of the SAS managed to blow up no less than 37 aircraft with his group and inflict massive damage. Because the Lewes bombs didn't always detonate, Stirling decided to turn back and fire at everything with their Vickers machineguns, In the process, they met little resistance as the Germans hadn't expected them to attack a second time. The units near Fuka scored less success. Fraser’s unit wasn’t able to inflict any damage whereas the French unit managed to destroy another eight bombers.
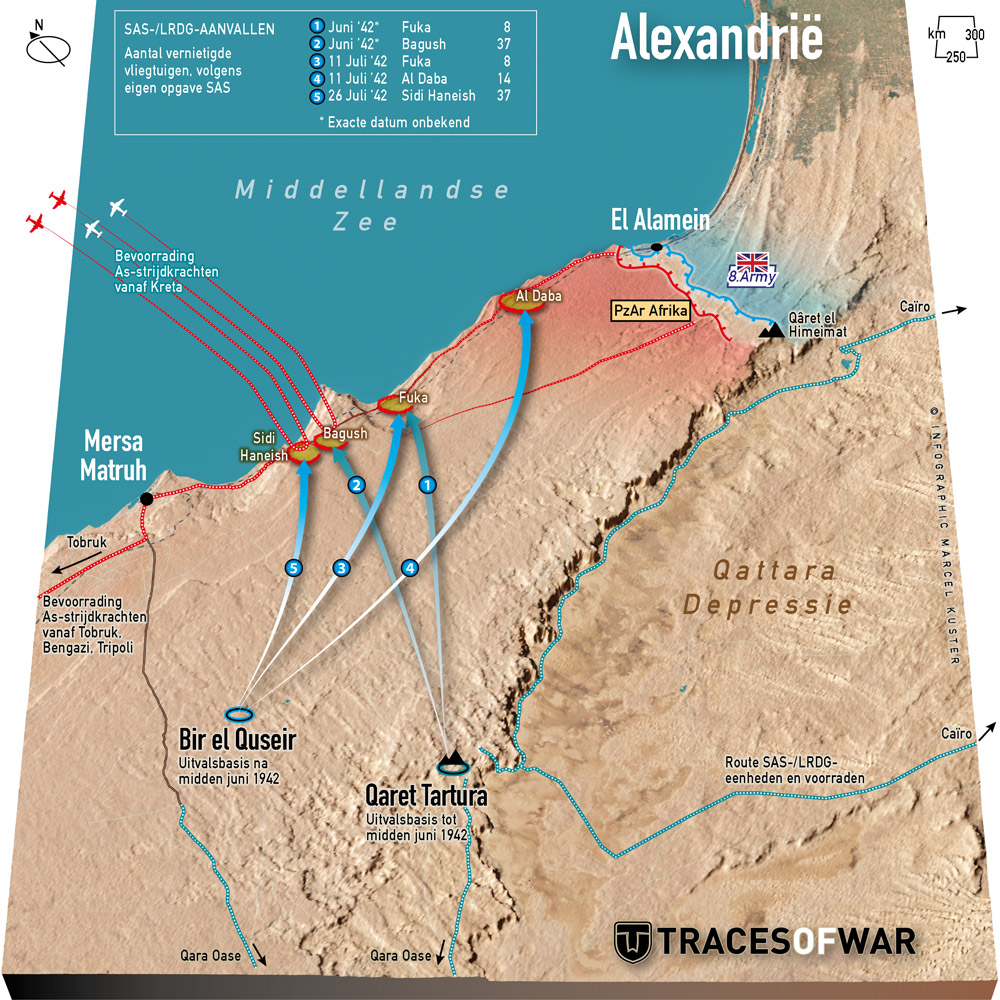
Overview of the various raids on airfields on the Libyan coast in June and July 1942 Source: Marcel Kuster, TracesOfWar
This kind of raids by the SAS continued throughout June and July 1942 (all raids are marked as the seventh on the map at the bottom). Until mid-June 1942, the jump-off base was Qaret Tartura and from then onwards Bir el Quesir. Relocating the base was a way to prevent discovery by the Germans or Italians. Fuka was attacked once more by French members of the SAS and they managed to blow op eight bombers. Mayne was successful on another airfield, Al Daba and managed to blow up 14 aircraft. A typical raid was carried out at Sidi Haneish where a SAS unit arrived right at the moment when a German bomber was landing. Stirling’s men drove right across the airfield in a so-called arrow formation with the jeeps in two columns. The jeeps on the right fired at everything on their right and the jeeps on the left at everything on their left. A deafening racket erupted in which the Germans and Italians managed to fight back. In the end, all men managed to escape but Stirling did lose a man. He was buried with the usual honor. By the way, the return journey was made in various small groups to prevent being lured into a massive trap by German or Italian fighters. The orders were to hide the jeeps in suitable locations and escape in the darkness of night. Unfortunately, the French unit with three jeeps was out of luck and subjected to nine attacks by fighters. All jeeps were shot up but moreover, they had lost their leader who had been riddled by bullets. On the airfield of Sidi Haneish, 37 bombers and fighters had been destroyed
The modus operandi on Sidi Haneish was characteristic for the men of the SAS which would be applied until the end of the war in various locations. Thanks to the presence of his son in previous operations, Winston Churchill was aware of the new unit. When Auchinleck asked Churchill for more patience, he was fired and after his successor, General Harold Alexander had been appointed in the Middle East, Stirling managed to arrange a meeting with Churchill in Cairo. There, the SAS leader managed to convince Churchill with his adventurous stories and the PM immediately liked him. Although Stirling got nothing done formally, he had Churchill, Alexander and Field Marshall Jan Smuts, (member of Churchill’s War Cabinet and Prime Minister of South-Africa) sign a paper as a souvenir of the meeting with Churchill. Later on, Stirling typed all sorts of so-called secret information on it, granting him authority over all Special Forces in North-Africa. Over the signatures he typed: ‘Please lend bearer of this all possible support.’ Although the document was a forgery, it gave Cooper and Seeking, responsible for the logistics of the SAS, an enormous advantage with the delivery of supplies. Suddenly they were able to get equipment such as vehicles, weapons and ammunition they usually had to wait a long time for.
Definitielijst
- mid
- Military intelligence service.
- raid
- Fast military raid in enemy territory
- resistance
- Resistance against the enemy. Often also with armed resources.
More operations
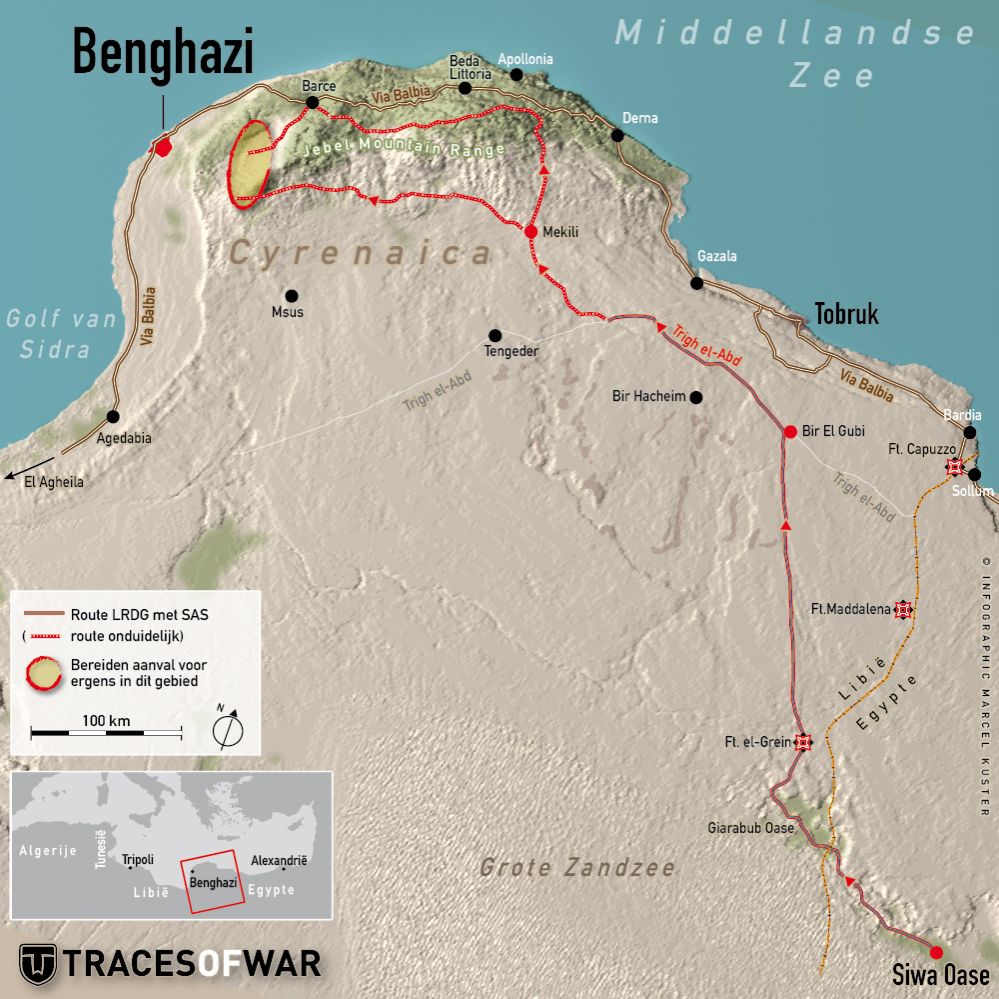
Overview of the roues of the SAS troops in the directioin of Benghazi up to the hiding place in the Jebel Mountain Range Source: Marcel Kuster, TracesOfWar
Now the next mission started while command in the Middle East had shifted from Auchinleck to Alexander. (the eight operation on the map at the bottom). The target: Benghazi. Stirling was to attack the town with a force of 200 men and destroy everything that lay in his path. He didn't have these 200 men yet so he had to take many men along who didn't have any experience yet or hadn't completed special training. The mission would take place on the west side of the Jebel Mountain Range, a green and articulated landscape where the troops could easily hide. The outward journey didn't proceed smoothly. Two of the light tanks, allocated to Stirling broke down and also one of the jeeps rolled over when it drove over a hump, the driver breaking his leg. Meanwhile, the Italians had laid mines on the border of the Jebel, one of the jeeps in the convoy struck one and burst into flames. One of the officers succumbed to serious burns and another had a leg amputated. Doctor Pleydell could do nothing more for this officer.
In the meantime, Stirling made contact with a Belgian spy who gathered information for the SAS in the Jebel. His name was Robert Melot and he was an expert in undercover life. His report for this mission was rather gloomy as his informants told him that the mission had been discovered. British Middle East HQ told Stirling though he should not believe these lies. The operation was to continue nonetheless and that message was received with mixed feelings. On September 13, 1942 the first group, led by spy Melot and Chris Bailey (a new recruit in the SAS) made a reconnaissance. They managed to overwhelm an Italian guard successfully but were injured themselves in the process. The rest of the men managed to get nearer to Benghazi, escorted by Melot’s Arabian informant. They encountered an obstacle along the way however that hadn't been there before. It was a trap and within minutes, the convoy was under machinegun and mortar fire from all sides. The first jeep turned away and the men in the second jeep opened fire in all directions with their Vickers machineguns. This worked but Stirling became well aware that the defense of Benghazi had been alerted so the element of surprise had vanished. Therefore the SAS leader decided to abort the attack and to try again later. On the return trip, Jim Almonds’ jeep was hit and caught fire. Almonds managed to jump clear in time but was made a prisoner-of-war. Eventually, he was shipped to Italy to be incarcerated but that didn't last long.
The first attempt to attack Benghazi hadn't gone unnoticed by the Luftwaffe either and it managed to pinpoint the location of the rendezvous and attacked the SAS. After the assault, which caused many victims, the convoy drove back to an encampment in the Jebel. There they were plastered again the next day by aircraft of German and Italian origin. As the camp had been discovered again, Stirling ordered the troops to relocate again within two hours but there wasn't enough space for all the injured: the result of shot up vehicles during the air raids of the past days. Doctor Pleydell was given the difficult task of selecting which wounded he would take along. It was heart breaking and difficult but it was the only decision possible as the lives of all others were at stake as well. It was decided to leave one medical officer behind with the injured and have them surrender to the enemy so they would receive medical care.
The members of this group didn't survive the war, including the medical officer, Ritchie who had stayed behind. He died of unknown causes in a Pow camp. Operation Bigami, as the raid on Benghazi was named, ended in an enormous failure. They had hardly been able to knock out enemy targets but they did lose a quarter of the 200 men and half the number of vehicles. Notwithstanding this and helped by the momentum in the war, the SAS was given its official status as a regiment on September 21, 1942.
After having received this status, Stirling was ordered to expand the unit to a force of 572 ranks and 29 officers. In its new form, the regiment would be split up in four squadrons: A squadron commanded by Paddy Mayne, B squadron led by Stirling himself, C squadron commanded by the Free French and D squadron led by George Jellicoe. This squadron also became the first unit of the Special Boat Squadron (SBS) destined for maritime and amphibious operations. Although he was enormously proud he had succeeded to establish a new regiment, his enthusiasm was somewhat muted by the arrival of a new commander in the Middle East, General Bernhard Montgomery who took over command of Eight Army. The first meeting between Stirling and Montgomery was far from friendly as the new commander of Eighth Army hated small talk and wanted to know immediately what Stirling had on his mind. The SAS leader didn't like this very much. The main problem was: Montgomery didn't want to listen during the conversation that followed and was especially full of himself, leaving no room for Stirling’s charms. Montgomery didn't want to place any of his men at Stirling’s disposal because he thought he could deploy them more efficiently.
This meant, Stirling had to reestablish his new regiment from scratch with new recruits. A process that would take far more time than taking over seasoned soldiers who had fought in the desert already. What Stirling didn't know was that during their conversation, Montgomery came across as rough and narcistic but the general was certainly impressed by Stirling. He was happy with the courage and energy demonstrated by Stirling’s troops and in talks with others he made it understood that he did recognize their value. Despite Stirling’s bad experience, he could count on support from above by the British general although he was not aware of it.
Now that the SAS possessed jeeps and with the arrival of Montgomery, a turnabout had emerged in the chances of British victory in North-Africa, the real strength of the SAS became obvious. Whereas regular armies planned and prepared their operation meticulously, the SAS relentlessly attacked random targets without hardly planning anything. It says much about the courage of the men of the regiment but also about the unpredictability and surely about the chaos that went with their operations. From Montgomery’s appointment onwards, the SAS focused more and more on the overstretched supply lines of the German-Italian opponent, (marked as the ninth operation on the map at the bottom). For instance, they blew up the railway between Tobruk and El Alamein so many times, when the tide had turned in favor of the British, they had to be reminded not to disrupt the supply of their own forces. This was the disadvantage of the modus operandi of Stirling’s forces: he had little stomach for communication and to tell other what the SAS was doing and this sometimes caused uneasy situations like for instance the blowing up of a railway whilst the territory already had fallen into British hands.
When on October 23, 1942 the Second Battle of El Alamein was launched, the tide definitely turned in favor of the British. They were assisted by an Anglo-American amphibious attack in Morocco, Operation Torch. Montgomery made progress fast and he had it noted that he thought the disruptive SAS operations essential for this victory. The chaos and destruction the SAS inflicted on the German-Italian supply lines was massive, let alone the negative effect on the opponent’s morale.
Definitielijst
- El Alamein
- City in North Egypt. The Battle of El Alamein took place from October to November 1942 and was a turning point in the war. The German-Italian advance in North Africa was finally halted by the Allies.
- Luftwaffe
- German air force.
- mortar
- Canon that is able to fire its grenades, in a very curved trajectory at short range.
- Pow
- Prisoner of War.
- raid
- Fast military raid in enemy territory
- regiment
- Part of a division. A division divided into a number of regiments. In the army traditionally the name of the major organised unit of one type of weapon.
A second regiment and last operations in North-Africa
The raids of the SAS continued in November and December, gradually further to the west as Montgomery’s troops gained more territory. During these raids, Paddy Mayne’s A squadron remained relatively unharmed but Stirling’s B squadron suffered many losses. This was due on the one hand to the untrained status of many of his men - Mayne’s had the most experienced veterans in his squadron but also because the presence of an Englishmen who spied for the Italians: Captain John Richards. He was British but a dedicated Fascist as well. Because of his nationality and his ideology he could do his work on both sides of the front undisturbed. When men of B squadron were in captivity, Richards was sent to them to eavesdrop, masquerading as an imprisoned British officer. In reality he managed in this way to pass on sensitive operational information to the Italian army leadership. This information eventually reached Rommel who took action accordingly. Nonetheless, the raids by the SAS were very successful and the new method of operation was embedded in the Allied modus operandi.
At the end of 1942, the SAS was again rewarded for its successes: the establishment of a second regiment, simply known as 2 SAS. From that moment on, the original regiment was known as 1 SAS. 2 SAS was commanded by Bill Stirling, David’s elder brother. The new regiment was added to First Army in Algeria and recruited its men from that region.
Meanwhile David Stirling of 1 SAS unfolded his plans for the final stage of operations of the SAS in North-Africa, marked as the final stage on the map at the bottom. Rommel would establish his final defense at the Mareth line, a string of fortifications on the Algerian-Libyan border. A group commanded by Lieutenant Harry Poat was to advance on Tripoli to prevent the docks from being destroyed. The second group, led by Frenchman Auguste Jordan would continuously carry out raids in the region between Sfax and Gabs, mainly on the railway line. A third group led by veteran Paddy Mayne was to carry out numerous raids around the Mareth line. The fourth group would be led by David Stirling and had the most ambitious goal: contact the forward elements of First Army right through the retreating Germans and Italians. If they succeeded, Stirling argued, the SAS could expand even further but in this way, an enormous amount of valuable information could be collected about the area and the status of the opponent.
The jump-off base for the operation was Bir Soltan in Algeria. Stirling had to find out whether Rommel indeed wanted to set up his defense on the Mareth line. He was to pass on this information to the forward elements of Montgomery’s troops, the 7th Armored Division. Subsequently, Stirling had to continue on his way through a natural obstacle, the so-called Gabes Gap. This strip of land was the only way to enter Algeria from Bir Soltan but was still in German-Italian hands. With much bravado they managed to pass an encampment of a German armored division which was just waking up. The group drove on, looking for a place to rest after a journey of 36 hours. They didn't get much rest though because they were discovered by a unit of the Luftwaffe. Sadler, Cooper and Taxis, a new Frenchman in the SAS, managed to escape but Stirling was made prisoner-of-war and taken away. The three escapees managed to stay out of German hands. In the end, after having wandered around for days, they accidently met the Free French of First Army.
Meanwhile, Stirling attempted to escape but to no avail. The locals were still on the side of the Italians which made escape nearly impossible. He was flown to Sicily and interrogated by Germans as well as Italians. Afterwards he was transferred to Rome and ended up in a Pow camp. There he was bored to death whilst the Italians were mighty proud they had captured Stirling. Rommel noted: ‘The British lost the very able and adaptable commander of the desert group which caused us more damage than any other British unit of equal size.’ During his imprisonment, Stirling became, not by coincidence, the neighbor of one John Richards, the spy of earlier days. Richards was tasked with getting as much information as possible out of Stirling. What was shared exactly never became entirely clear as Stirling and Richards contradicted each other after the war. What we do know is that the Germans found out very soon that Paddy Mayne would become the new leader of the SAS. Shortly before the unrest in Italy, Stirling was transferred to Colditz, a notorious German Pow camp. There he was united with some other members of the SAS who had been made prisoners earlier on.
In North-Africa, the war was over for the SAS. The unit had grown enormously and had introduced a new way of warfare. The operations would henceforth continue in Italy and once again, the SAS would operate in a different way, led by its new commander, Paddy Mayne.
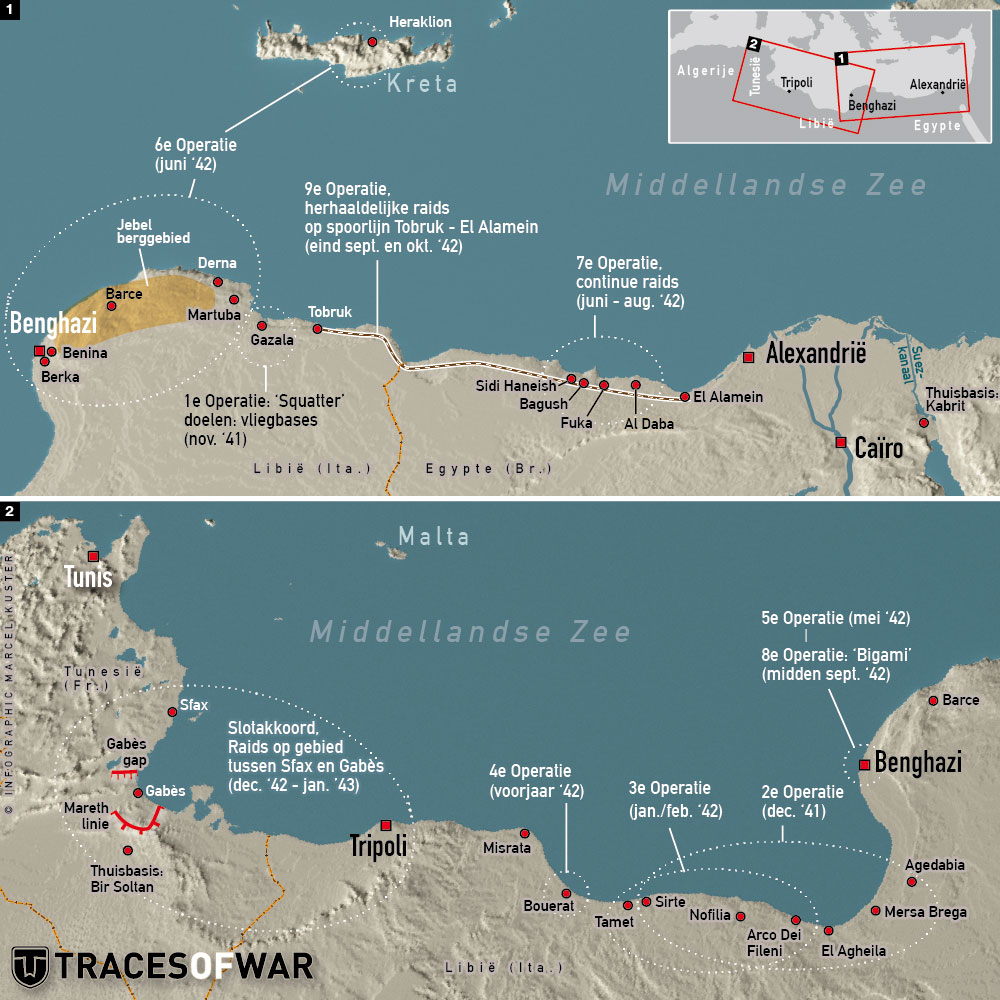
Overview of the SAS operations in North-Africa Source: Marcel Kuster, Traces of War
Definitielijst
- ideology
- A collection of principles and ideas of a certain system.
- Luftwaffe
- German air force.
- Pow
- Prisoner of War.
- regiment
- Part of a division. A division divided into a number of regiments. In the army traditionally the name of the major organised unit of one type of weapon.
Information
- Article by:
- Matthias Ouwejan
- Translated by:
- Arnold Palthe
- Published on:
- 29-12-2022
- Last edit on:
- 02-01-2023
- Feedback?
- Send it!

News

Jan2024
Mike Sadler, desert navigator who guided WWII commandos, dies at 103
The stars, sun and surveyor’s instruments were his only tools to lead British special forces through the North African desert during World War II.
Related sights
Looking for reliable information or news facts about WW2? Do you want to create your own battlefield tour to sights of wars from the past? Or are you interested in war medals and their recipients? TracesOfWar.com tells you more!
More information

© STIWOT, 1999-2025. All rights reserved. Privacy statement, cookies, disclaimer and copyright