Correction liberation monument Stiphout
Our investigation into Helmond war victims sometimes produces a remarkable catch. At a meeting of battlefield guides we spoke with a guide from Nuenen. Referring to the corrections he figured that we were talking about the monument in Stiphout, because, according to him, there appears a wrong battalion on the panels. We could hardly believe this, another monument with an error? Could this be true?
It did not acquire much investigation. Leo van Aerle, the specialist on WWII in Helmond already wrote about it in 2004. The monument, erected in 1986, contains the plaques of the 2nd Battalion, Fife and Forfar Yeomanry and the 8th Battalion, The Rifle Brigade1. Both units were part of the 11th Armoured Divison, of which the “Charging Bull” was the distinctive emblem. Instead of the 2nd Fife and Forfar Yeomanry it should be the 23rd Hussars.
Van Aerle wrote in 20042: “A monument deserves a historically correct mention of the units to which Stiphout owes its liberation. Veterans who visited the monument in Stiphout in the past were part of the armed forces who fought at the bridge in Asten among other places. Nonetheless, they spoke admiringly about the gratitude and the enthusiastic welcome of the population. Their reaction to the wrong mention on the monument is, however understandable; 'it’s a pity, we were not here… we were at the Asten bridgehead'.”
In the meantime, the plaques on the monument are very weather beaten, some hardly readable. That was already the case in 2004, in 2015 it grew only worse. “Perhaps not quite that bad”, Van Aerle states in 2004. However, he still hoped for a swift correction2. That correction was still not implemented in the summer of 2015, 11 years later. Unfortunately, Van Aerle passed away too early in 20123. These monuments ensure that we do not forget what happened in the Second World War. Shouldn’t we then make sure that they at least provide the correct information? Is that not something we are obliged to with regard to the soldiers who fought for our liberation? And not only to them, but also to Leo van Aerle, who paid attention to it 11 years ago and for future generations, so that they at least get the right information.
The liberation of Stiphout
We are writing September 1944. Mad Tuesday is just behind us and operation Market Garden4 is just about to begin. The strategic goal of operation Market Garden was the establishment of a bridgehead on the Veluwe with offshoots across the IJssel river5. For this, the well-known airborne troops were deployed who had to capture a number of river crossings over which the ground troops could advance. The bridge at Arnhem proved eventually to be ‘a bridge too far’. The ground forces were from the XXX Corps. This Corps would advance over the ‘Hell’s Highway’ from the Belgian border to Eindhoven, Nijmegen en Arnhem. The Corps was supported on its left flank by the XII Corps and on the right flank by the VIII Corps. The latter unit therefore became responsible for the area around Stiphout and Helmond. The 11th Armoured Division was part of the VIII Corps and was led by lieutenant-general G.P.B. Roberts6. The 23rd Hussars and the 8th Battalion, The Rifle Brigade was both part of the 11th Armoured Divison.
Patrick Delaforce writes about the 11th Armoured Division in his book 'The Black Bull': “On the night of the 20th the advanced units were changed. The 3rd Royal Tank Regiment and the 3rd Monmouthshire Regiment with the 23rd Hussars and 8th Rifles came under the command of the 29th Brigade and the 2nd Fife and Forfarshire and 1st Herefordshire Light Infantry together with the 4th King's Shropshire Light Infantry and 15/19th Hussars under the command of the 159th Brigade. 29th Brigade was directed to the north and the 159th to Someren”.7 The 3rd Royal Tank Regiment, 23rd Hussars and 2nd Fife and Forfarshire were the tank units, equipped with Sherman tanks. The 15/19th Hussars was the reconnaissance unit of the division, the remaining units belonged to the infantry.8 A good many units, but it also shows that the 23rd Hussars and the 8th Rifles cooperated with each other. So the 2nd Fife and Forfar was sent to Someren under another brigade. The War Diary of the 8th Rifles writes about this on the 20th: “Still together with the 23th Hussars, we are advancing along the right flank of the Guards. There was little opposition and we reached Heeze”. 9
On the 21st of September, the 23rd Hussars and the 8th Rifles advanced from Geldrop in the direction of Nuenen, trying to reach Gerwen and the Gerwense Heide (Heath) north of Gerwen. Nuenen was reached without a struggle, but after leaving Nuenen, ‘B” Squadron encountered German tanks from the direction of Gerwen. ‘A’ Squadron tried to reach the target, westerly from Neerwetten but was also stopped. Next, ‘C’ Squadron tried to advance in the direction of Stiphout but there they also met German tanks. It was decided to try to reach Gerwen, but the resistance there was so great that the attack was postponed until the following morning.10 The German tanks were of the Panzer-Brigade 107. Around the end of the afternoon at least two Panthers were eliminated.11
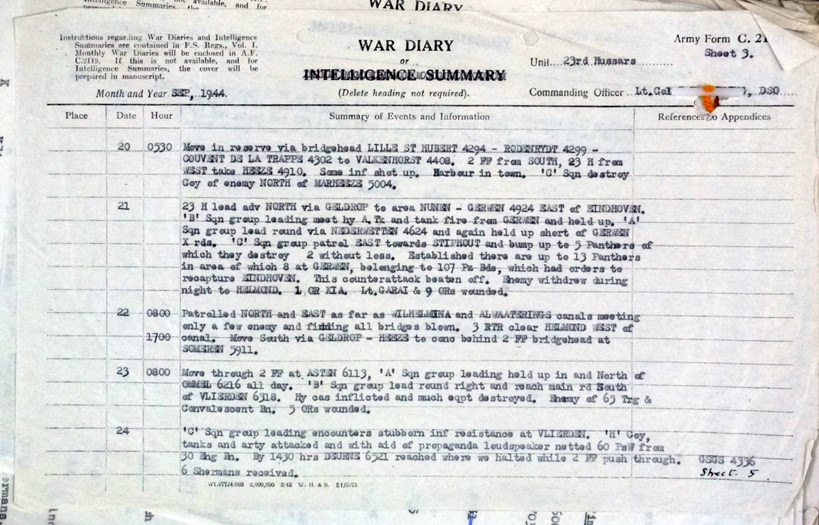
War Diary 23rd Hussars

War Diary 8th Rifles
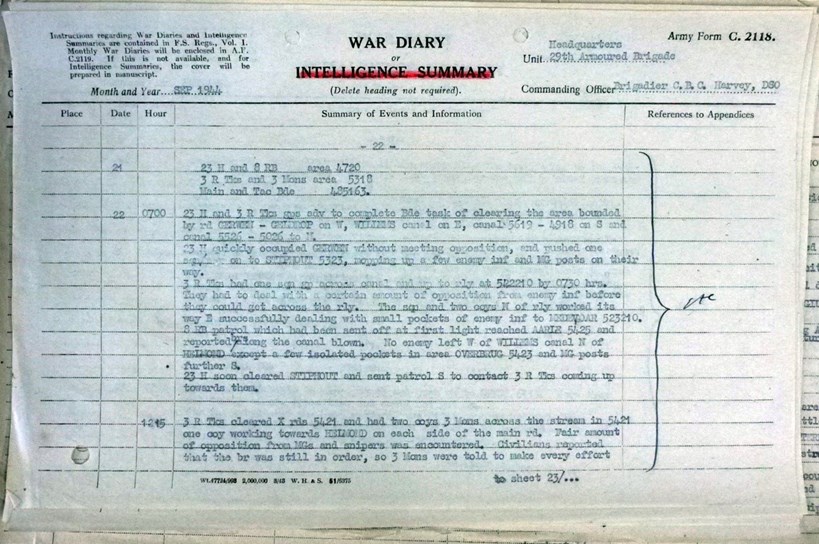
War Diary 29th Armoured Brigade
The next morning, the 22nd, the advance was resumed in the direction of Gerwen. There was still opposition from the Germans. In the woods in particular, there were still many Germans with anti-tank weapons.12 The 8th Rifles were deployed to wipe the woods clean. The 23rd Hussars were deployed mainly to rid Stiphout of the last Germans.13 Stiphout was code-named ‘Striptease’ which speedily became ‘Jane’. Jane was a comic in the Daily Mirror from 1932 to 1959. During the Second World War, the main character became particularly popular among soldiers because she lost her clothes rather quickly… The story of the 23rd Hussars writes about it: “These names were devised on the spot and fooled just as many of our own tank commanders as the enemy”.14
Due to the advance of the British to Stiphout, the last of the Germans withdrew on Helmond. After this, it went fast and in the beginning of the afternoon Gerwen, as well as Stiphout were liberated. The British marched further in the direction of Helmond.15 However the bridges over the Zuid-Willemsvaart in Helmond were already blown up.16 The tram bridge was blown on 13 September, followed by the railway bridge on the 18th and the two drawbridges over the Zuid-Willemsvaart eventually on the 22nd.17 Having ascertained this, the 23rd Hussars and 8th Rifles proceeded to the south in the direction of Geldrop-Heeze to join the bridgehead at Someren.18 Major Noel Bell of the 8th Rifles wrote: “Our position was clear now, we were locked in by canals and no further progress seemed likely in the near future. So we weren’t surprised when we heard that we had to head south again, towards Geldrop and Heeze”. 19
Where was the 2nd Fife and Forfar Yeomanry?
But where was the 2nd Fife and Forfar Yeomanry in this story? Not in this neighbourhood is the answer. The 11th Armoured took up a plan to liberate Helmond by way of a pincer movement. The 8th Rifles and 23rd Hussars formed the northern assault force. The 2nd Fife and Forfar was situated much more southerly, namely at Sluis 11 in the direction of Asten. Major Steel Brownlie writes about it in ‘The Proud Trooper’; “On the 21st there was a regrouping where the 2nd Fife and Forfar and the 1st Herefords were transferred to the 159 Brigade. […] Both units arrived at Someren and saw that all bridges were blown up. Whereas the 29th Brigade operated in the north, a crossing was planned whereby the 159 Brigade could negotiate a turning movement beyond Helmond in order to attack the units opposite the 29 Brigade in the back.”20 On the 21st of September the 2nd Fife and Forfar was in Someren and reached the Zuid-Willemsvaart. During the evening the 1st Herefords managed to establish a bridgehead on the other side of the canal.21 During the night of 21 to 22 September the engineers constructed a Baily bridge across the canal at Sluis 11, after which ‘A’ Squadron of the 2nd Fife and Forfar could be sent in the direction of Asten.
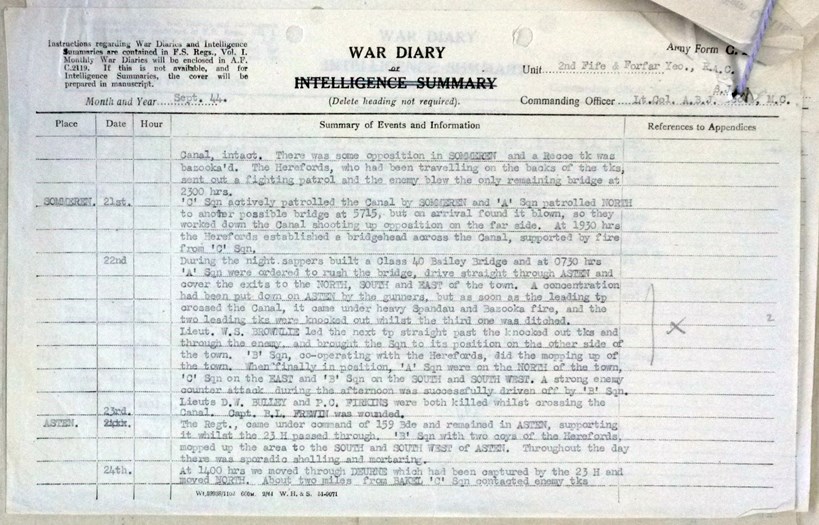
War Diary 2nd Fife and Forfar Yeomanry
The War Diary of the 2nd Fife and Forfar tells: “As soon as the first troop [from A squadron] crossed the canal they were pinned down by heavy Spandau and Bazooka fire. The first two tanks were eliminated and the third was abandoned. Lieutenant W.S. Brownlie led the next troop beyond the eliminated tanks and through the enemy lines to the other side of the village [Asten]. B. squadron, together with the Herefords, cleared the enemy units in the village.
Because the northern attack on Helmond got stuck on much German opposition and the bridges in Helmond were blown up, the liberation of the eastern part of Helmond arrived by way of the bridgehead at Asten. Where the western part was already liberated on 22 September, for the rest of Helmond the liberation came only on 25 September.22
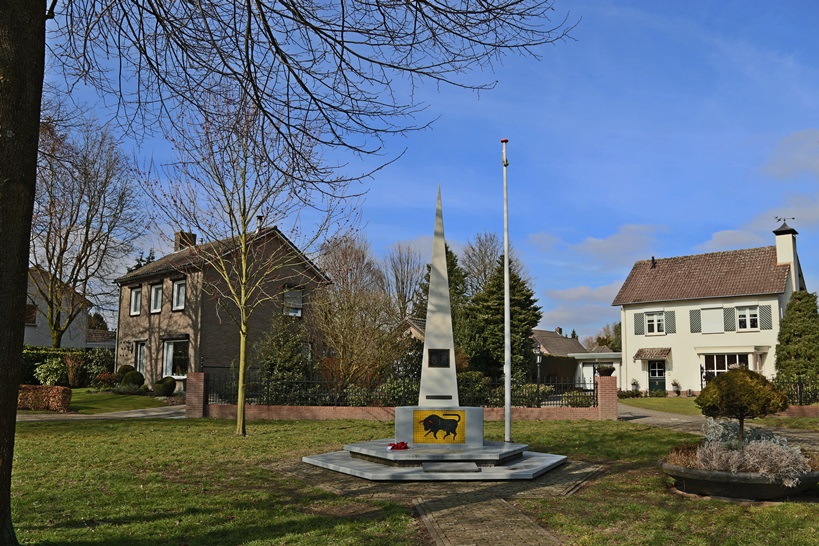
The monument
The monument at Stiphout is described by the National Committee 4 and 5 May as follows: “The liberation monument is a modern designed obelisk. A bull is depicted on the commemorative needle. The memorial is 3 meters high.”23 Apart from the bull identical black plaques are attached on three sides with the units who liberated Stiphout. So here the 2nd Fife and Forfar erroneously appears instead of the 23rd Hussars.
The monument at Stiphout is managed by the ‘Vriendengroep [friends] De Badroaven’. We have of course contacted them. They were aware of the fact that there was an error in the text, but due to the passing away of Van Aerle, the knowledge of what exactly had gone wrong had been lost. Meanwhile, the monument has been modified, in time for the commemoration on Tuesday 22 September at 19:00 hours.
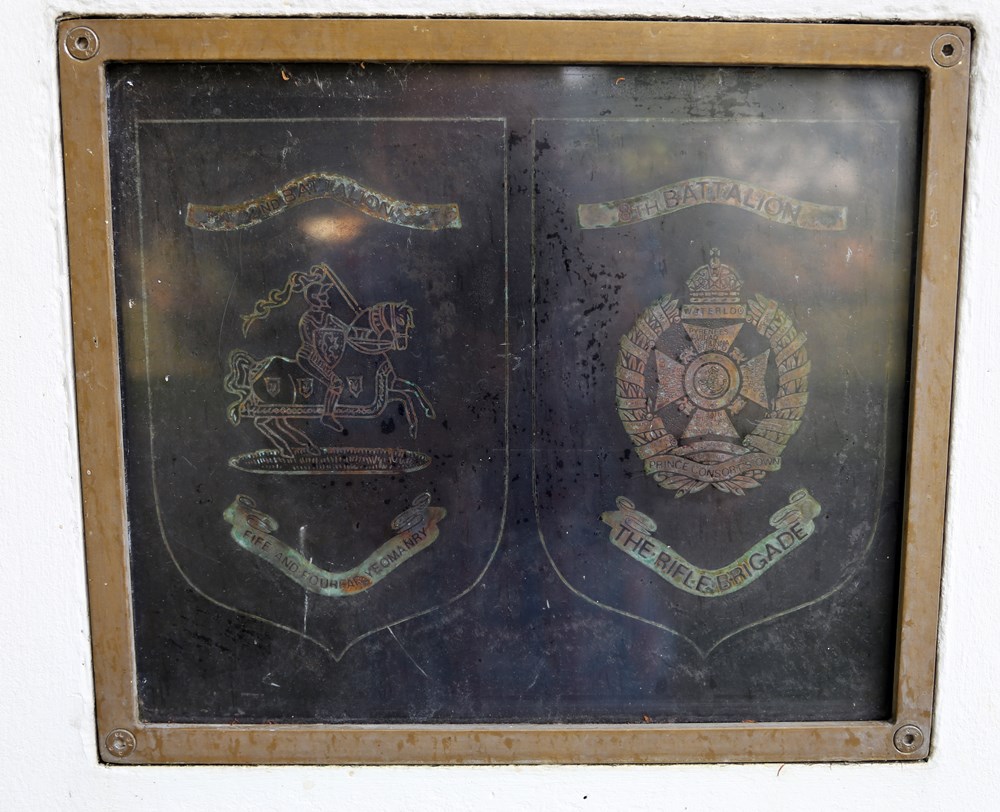
The least bad of the three plaques on the current monument
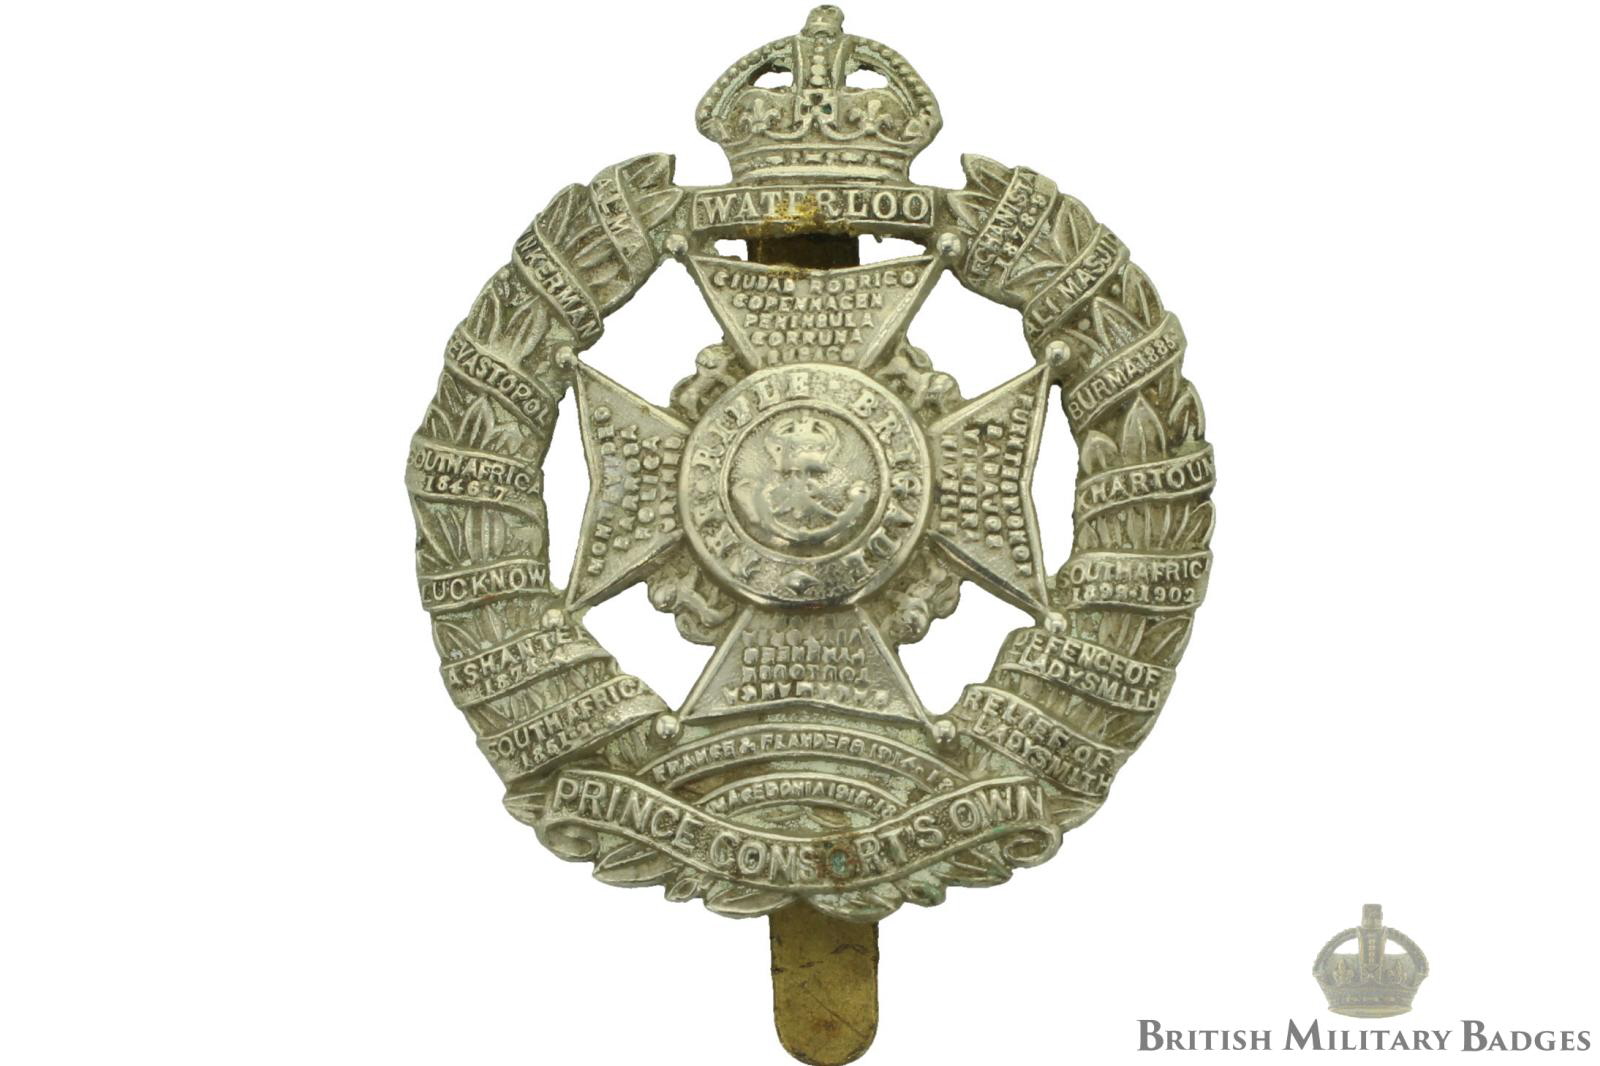
Cap Badge of the 8th Battalion, The Rifle Brigade24
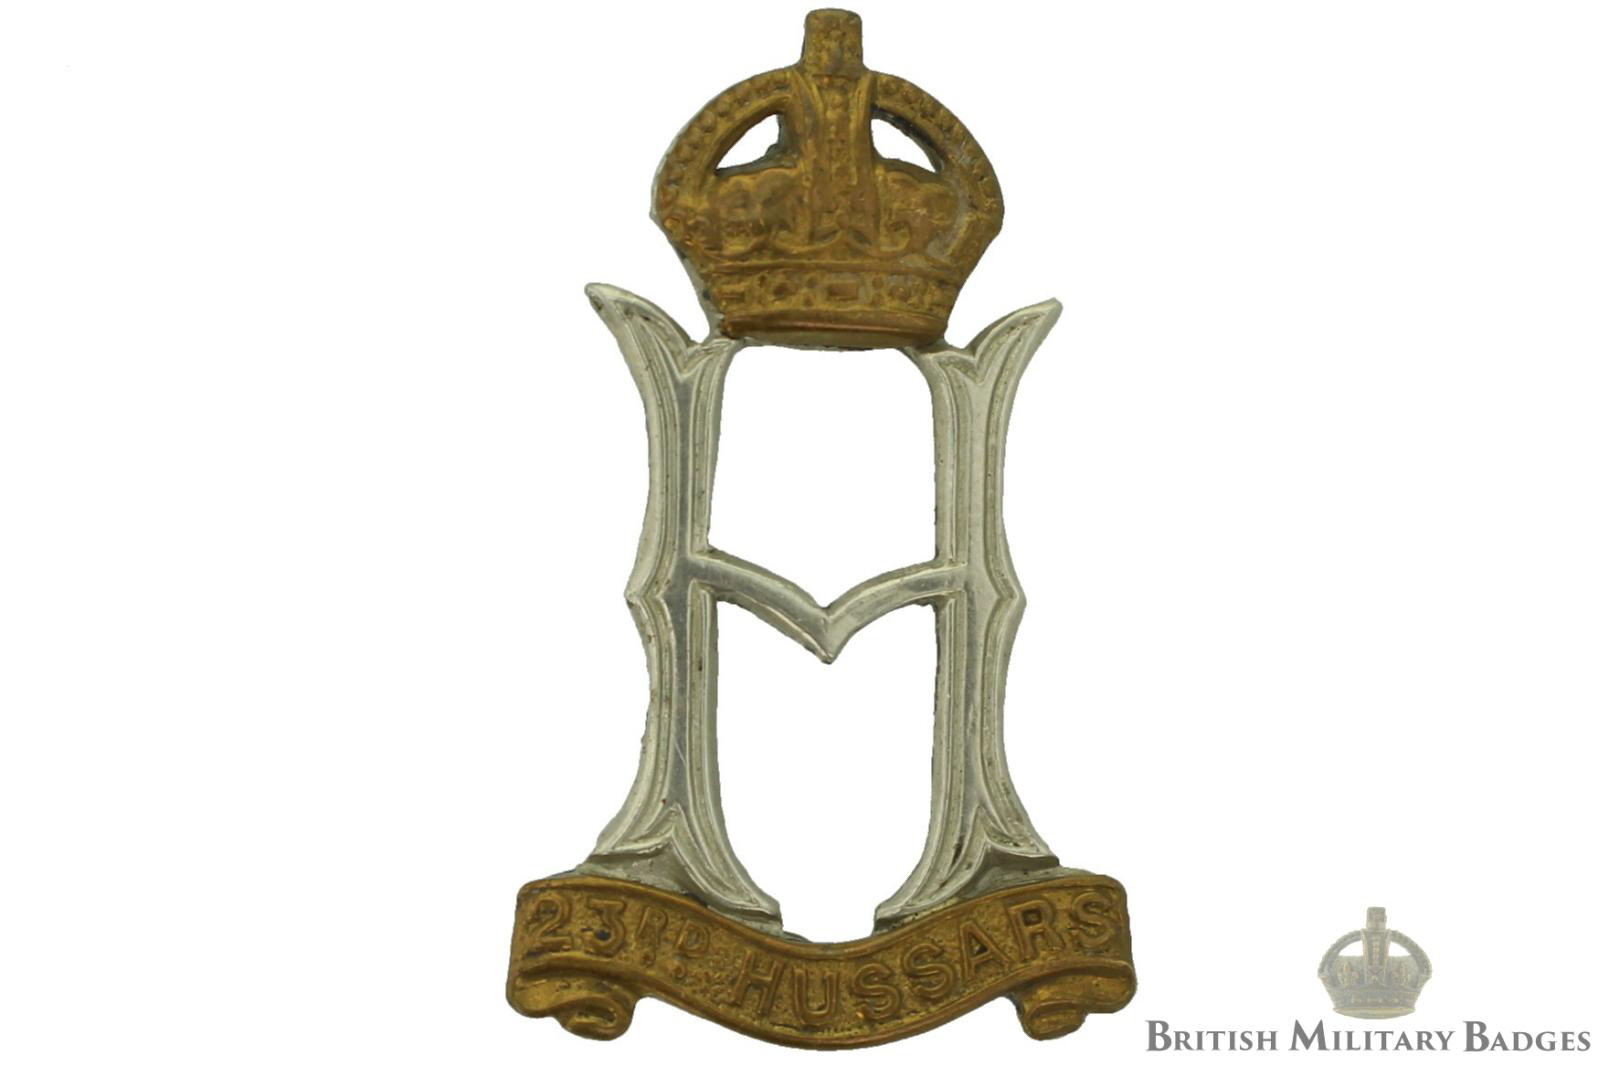
Cap Badge of the 23rd Hussars24
Dedicated to the late Leo van Aerle. He had already thoroughly researched and written everything down.
Many thanks to:
English translation by: Cor Korpel
STIWOT-colleagues; Jeroen Niels, Frank van der Drift, Ewoud van Eig, Kevin Prenger and Barry van Veen.
Gemeente Helmond, in particular Piet van Schijndel.
Regionaal Historisch Centrum Eindhoven, in particular Egbert Wijnen.
Oorlogsmuseum Overloon
Bevrijdende Vleugels Best
Theo van de Ven
Edwin Popken
Eef Luyben
Reinier van den Eerenbeemt and Patrick van Halen, New Vision
Richard Schoutissen
Jack Didden
Andrew Newson
Mike Young, North East Medals
Daniel Baker, British Military Badges, for using the cap badge images.
Notes
1 Oorlogsmonument Stiphout - Stiphout, Helmond - TracesOfWar.com
2 Historie Mierlo Hout - DEEL 4: De bevrijders van Stiphout
3 Leo van Aerle overleden - WO2Actueel.nl
4 Go2War2.nl - Operatie Market Garden
5 De mythe ‘slag om Arnhem’ - Kritisch historicus
6 World War 2 Awards.com - ROBERTS, George Philip Bradley "Pip"
7 The Black Bull, P. Delaforce, page 153
8 The Black Bull, P. Delaforce, page 9
9 WO 171-1359, War Diary 8th Rifles
10 Helmond in de tang genomen, L. van Aerle, 1993
11 WO 171-847, War Diary 23rd Hussars
12 Helmond in de tang genomen, L. van Aerle, 1993
13 WO 171/627, War Diary 29th Armoured Brigade
14 The Story of the 23rd Hussars 1940-1946
15 Helmond in de tang genomen, L. van Aerle, 1993
16 WO 171-847, War Diary 23rd Hussars
17 RHCe 12242, doos 1, Verslag van het plaatsvervangend hoofd van de luchtbeschermingsdienst Helmond
18 WO 171-847, War Diary 23rd Hussars
19 From the Beaches to the Baltic, Major N. Bell
20 The Proud Trooper, Major W. Steel Brownlie
21 WO 171-853, War Diary 2nd Fife and Forfar Yeomanry
22 WO 171-1350, War Diary 1st Battalion Royal Norfolk Regiment & Taurus Pursuant, A History of 11th Armoured Division, E. Palamountain
23 Nationaal Comité 4 en 5 mei - Oorlogsmonument - Stiphout, bevrijdingsmonument
24 British Military Badges
It did not acquire much investigation. Leo van Aerle, the specialist on WWII in Helmond already wrote about it in 2004. The monument, erected in 1986, contains the plaques of the 2nd Battalion, Fife and Forfar Yeomanry and the 8th Battalion, The Rifle Brigade1. Both units were part of the 11th Armoured Divison, of which the “Charging Bull” was the distinctive emblem. Instead of the 2nd Fife and Forfar Yeomanry it should be the 23rd Hussars.
Van Aerle wrote in 20042: “A monument deserves a historically correct mention of the units to which Stiphout owes its liberation. Veterans who visited the monument in Stiphout in the past were part of the armed forces who fought at the bridge in Asten among other places. Nonetheless, they spoke admiringly about the gratitude and the enthusiastic welcome of the population. Their reaction to the wrong mention on the monument is, however understandable; 'it’s a pity, we were not here… we were at the Asten bridgehead'.”
In the meantime, the plaques on the monument are very weather beaten, some hardly readable. That was already the case in 2004, in 2015 it grew only worse. “Perhaps not quite that bad”, Van Aerle states in 2004. However, he still hoped for a swift correction2. That correction was still not implemented in the summer of 2015, 11 years later. Unfortunately, Van Aerle passed away too early in 20123. These monuments ensure that we do not forget what happened in the Second World War. Shouldn’t we then make sure that they at least provide the correct information? Is that not something we are obliged to with regard to the soldiers who fought for our liberation? And not only to them, but also to Leo van Aerle, who paid attention to it 11 years ago and for future generations, so that they at least get the right information.
The liberation of Stiphout
We are writing September 1944. Mad Tuesday is just behind us and operation Market Garden4 is just about to begin. The strategic goal of operation Market Garden was the establishment of a bridgehead on the Veluwe with offshoots across the IJssel river5. For this, the well-known airborne troops were deployed who had to capture a number of river crossings over which the ground troops could advance. The bridge at Arnhem proved eventually to be ‘a bridge too far’. The ground forces were from the XXX Corps. This Corps would advance over the ‘Hell’s Highway’ from the Belgian border to Eindhoven, Nijmegen en Arnhem. The Corps was supported on its left flank by the XII Corps and on the right flank by the VIII Corps. The latter unit therefore became responsible for the area around Stiphout and Helmond. The 11th Armoured Division was part of the VIII Corps and was led by lieutenant-general G.P.B. Roberts6. The 23rd Hussars and the 8th Battalion, The Rifle Brigade was both part of the 11th Armoured Divison.
Patrick Delaforce writes about the 11th Armoured Division in his book 'The Black Bull': “On the night of the 20th the advanced units were changed. The 3rd Royal Tank Regiment and the 3rd Monmouthshire Regiment with the 23rd Hussars and 8th Rifles came under the command of the 29th Brigade and the 2nd Fife and Forfarshire and 1st Herefordshire Light Infantry together with the 4th King's Shropshire Light Infantry and 15/19th Hussars under the command of the 159th Brigade. 29th Brigade was directed to the north and the 159th to Someren”.7 The 3rd Royal Tank Regiment, 23rd Hussars and 2nd Fife and Forfarshire were the tank units, equipped with Sherman tanks. The 15/19th Hussars was the reconnaissance unit of the division, the remaining units belonged to the infantry.8 A good many units, but it also shows that the 23rd Hussars and the 8th Rifles cooperated with each other. So the 2nd Fife and Forfar was sent to Someren under another brigade. The War Diary of the 8th Rifles writes about this on the 20th: “Still together with the 23th Hussars, we are advancing along the right flank of the Guards. There was little opposition and we reached Heeze”. 9
On the 21st of September, the 23rd Hussars and the 8th Rifles advanced from Geldrop in the direction of Nuenen, trying to reach Gerwen and the Gerwense Heide (Heath) north of Gerwen. Nuenen was reached without a struggle, but after leaving Nuenen, ‘B” Squadron encountered German tanks from the direction of Gerwen. ‘A’ Squadron tried to reach the target, westerly from Neerwetten but was also stopped. Next, ‘C’ Squadron tried to advance in the direction of Stiphout but there they also met German tanks. It was decided to try to reach Gerwen, but the resistance there was so great that the attack was postponed until the following morning.10 The German tanks were of the Panzer-Brigade 107. Around the end of the afternoon at least two Panthers were eliminated.11
War Diary 23rd Hussars
War Diary 8th Rifles
War Diary 29th Armoured Brigade
The next morning, the 22nd, the advance was resumed in the direction of Gerwen. There was still opposition from the Germans. In the woods in particular, there were still many Germans with anti-tank weapons.12 The 8th Rifles were deployed to wipe the woods clean. The 23rd Hussars were deployed mainly to rid Stiphout of the last Germans.13 Stiphout was code-named ‘Striptease’ which speedily became ‘Jane’. Jane was a comic in the Daily Mirror from 1932 to 1959. During the Second World War, the main character became particularly popular among soldiers because she lost her clothes rather quickly… The story of the 23rd Hussars writes about it: “These names were devised on the spot and fooled just as many of our own tank commanders as the enemy”.14
Due to the advance of the British to Stiphout, the last of the Germans withdrew on Helmond. After this, it went fast and in the beginning of the afternoon Gerwen, as well as Stiphout were liberated. The British marched further in the direction of Helmond.15 However the bridges over the Zuid-Willemsvaart in Helmond were already blown up.16 The tram bridge was blown on 13 September, followed by the railway bridge on the 18th and the two drawbridges over the Zuid-Willemsvaart eventually on the 22nd.17 Having ascertained this, the 23rd Hussars and 8th Rifles proceeded to the south in the direction of Geldrop-Heeze to join the bridgehead at Someren.18 Major Noel Bell of the 8th Rifles wrote: “Our position was clear now, we were locked in by canals and no further progress seemed likely in the near future. So we weren’t surprised when we heard that we had to head south again, towards Geldrop and Heeze”. 19
Where was the 2nd Fife and Forfar Yeomanry?
But where was the 2nd Fife and Forfar Yeomanry in this story? Not in this neighbourhood is the answer. The 11th Armoured took up a plan to liberate Helmond by way of a pincer movement. The 8th Rifles and 23rd Hussars formed the northern assault force. The 2nd Fife and Forfar was situated much more southerly, namely at Sluis 11 in the direction of Asten. Major Steel Brownlie writes about it in ‘The Proud Trooper’; “On the 21st there was a regrouping where the 2nd Fife and Forfar and the 1st Herefords were transferred to the 159 Brigade. […] Both units arrived at Someren and saw that all bridges were blown up. Whereas the 29th Brigade operated in the north, a crossing was planned whereby the 159 Brigade could negotiate a turning movement beyond Helmond in order to attack the units opposite the 29 Brigade in the back.”20 On the 21st of September the 2nd Fife and Forfar was in Someren and reached the Zuid-Willemsvaart. During the evening the 1st Herefords managed to establish a bridgehead on the other side of the canal.21 During the night of 21 to 22 September the engineers constructed a Baily bridge across the canal at Sluis 11, after which ‘A’ Squadron of the 2nd Fife and Forfar could be sent in the direction of Asten.
War Diary 2nd Fife and Forfar Yeomanry
The War Diary of the 2nd Fife and Forfar tells: “As soon as the first troop [from A squadron] crossed the canal they were pinned down by heavy Spandau and Bazooka fire. The first two tanks were eliminated and the third was abandoned. Lieutenant W.S. Brownlie led the next troop beyond the eliminated tanks and through the enemy lines to the other side of the village [Asten]. B. squadron, together with the Herefords, cleared the enemy units in the village.
Because the northern attack on Helmond got stuck on much German opposition and the bridges in Helmond were blown up, the liberation of the eastern part of Helmond arrived by way of the bridgehead at Asten. Where the western part was already liberated on 22 September, for the rest of Helmond the liberation came only on 25 September.22
The monument
The monument at Stiphout is described by the National Committee 4 and 5 May as follows: “The liberation monument is a modern designed obelisk. A bull is depicted on the commemorative needle. The memorial is 3 meters high.”23 Apart from the bull identical black plaques are attached on three sides with the units who liberated Stiphout. So here the 2nd Fife and Forfar erroneously appears instead of the 23rd Hussars.
The monument at Stiphout is managed by the ‘Vriendengroep [friends] De Badroaven’. We have of course contacted them. They were aware of the fact that there was an error in the text, but due to the passing away of Van Aerle, the knowledge of what exactly had gone wrong had been lost. Meanwhile, the monument has been modified, in time for the commemoration on Tuesday 22 September at 19:00 hours.
The least bad of the three plaques on the current monument
Cap Badge of the 8th Battalion, The Rifle Brigade24
Cap Badge of the 23rd Hussars24
Dedicated to the late Leo van Aerle. He had already thoroughly researched and written everything down.
Many thanks to:
English translation by: Cor Korpel
STIWOT-colleagues; Jeroen Niels, Frank van der Drift, Ewoud van Eig, Kevin Prenger and Barry van Veen.
Gemeente Helmond, in particular Piet van Schijndel.
Regionaal Historisch Centrum Eindhoven, in particular Egbert Wijnen.
Oorlogsmuseum Overloon
Bevrijdende Vleugels Best
Theo van de Ven
Edwin Popken
Eef Luyben
Reinier van den Eerenbeemt and Patrick van Halen, New Vision
Richard Schoutissen
Jack Didden
Andrew Newson
Mike Young, North East Medals
Daniel Baker, British Military Badges, for using the cap badge images.
Notes
1 Oorlogsmonument Stiphout - Stiphout, Helmond - TracesOfWar.com
2 Historie Mierlo Hout - DEEL 4: De bevrijders van Stiphout
3 Leo van Aerle overleden - WO2Actueel.nl
4 Go2War2.nl - Operatie Market Garden
5 De mythe ‘slag om Arnhem’ - Kritisch historicus
6 World War 2 Awards.com - ROBERTS, George Philip Bradley "Pip"
7 The Black Bull, P. Delaforce, page 153
8 The Black Bull, P. Delaforce, page 9
9 WO 171-1359, War Diary 8th Rifles
10 Helmond in de tang genomen, L. van Aerle, 1993
11 WO 171-847, War Diary 23rd Hussars
12 Helmond in de tang genomen, L. van Aerle, 1993
13 WO 171/627, War Diary 29th Armoured Brigade
14 The Story of the 23rd Hussars 1940-1946
15 Helmond in de tang genomen, L. van Aerle, 1993
16 WO 171-847, War Diary 23rd Hussars
17 RHCe 12242, doos 1, Verslag van het plaatsvervangend hoofd van de luchtbeschermingsdienst Helmond
18 WO 171-847, War Diary 23rd Hussars
19 From the Beaches to the Baltic, Major N. Bell
20 The Proud Trooper, Major W. Steel Brownlie
21 WO 171-853, War Diary 2nd Fife and Forfar Yeomanry
22 WO 171-1350, War Diary 1st Battalion Royal Norfolk Regiment & Taurus Pursuant, A History of 11th Armoured Division, E. Palamountain
23 Nationaal Comité 4 en 5 mei - Oorlogsmonument - Stiphout, bevrijdingsmonument
24 British Military Badges
Used source(s)
- Source: Jeroen Koppes, STIWOT
- Published on: 14-09-2015 15:50:26

Latest news
- 03-10: Photo report other Airborne commemorations and events 2025
- 01-10: Photo report commemoration Wiltshire memorial
- 30-09: Photo report other Airborne commemorations and events 2025
- 26-09: Photo report Ounveiling Plaque 'Gunners within 1st Airborne Division'
- 25-09: Photo report unveiling Plaque 'Gunners within 1st Airborne Division'
- 24-09: Photo report Airborne commemoration Driel
- 23-09: Photo report Airborne Landing and Commemoration
- 22-09: Photo report Airborne Memorial Service Oosterbeek
- 23-06: Keeping the memory of the trails to freedom alive
- 12-04: Understanding the German side of the fighting in Normandy
Looking for reliable information or news facts about WW2? Do you want to create your own battlefield tour to sights of wars from the past? Or are you interested in war medals and their recipients? TracesOfWar.com tells you more!
More information

© STIWOT, 1999-2025. All rights reserved. Privacy statement, cookies, disclaimer and copyright